MASV Portals offer a simple and organized way to request and receive files from your clients, colleagues, or content creators. You can create as many Portals as you want to facilitate your workflow and track file transfers.
This page includes the following topics
Overview
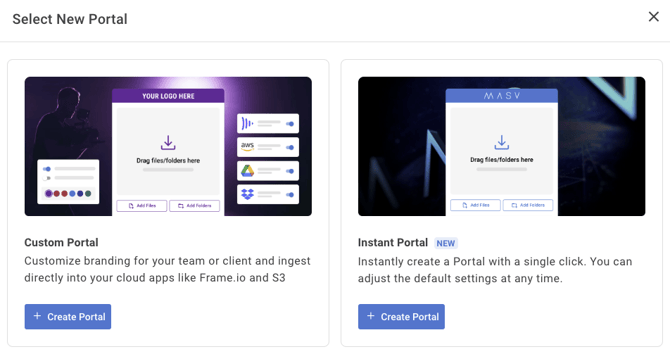
In a hurry? Use Instant Portal to create a MASV Portal with a single click.
Need a custom look or have integration or metadata requirements? Use our Custom Portal to:
- Brand the Portal with your logo, colors, and a custom background.
- Integrate directly with cloud storage, cloud collaboration, and asset management sites.
- Collect metadata, set rules and specifications, and apply terms of service agreements.
You can also automate uploads and downloads from Portals. For more information, see How to automate file transfers with MASV.
To create an Instant Portal
- In the MASV Web App, in the sidebar on the left, select Request Files with Portals.
- On the Request Files page, do one of the following:
- If this is your first Portal, select Instant Portal.
- If you already have one or more Portals, select the New Portal button, then select Instant Portal.
- If you want to share the Portal link immediately, do one of the following:
- To get a URL that you can paste into your preferred means of communication, select Copy Portal URL, and select Finish.
- To send the Portal URL directly to one or more email recipients, select Send Upload Request. In the Send Upload Request Via Email window select the Portal link, enter your email recipients, type a message, and select Send Request.
Note: At any time, you can customize or edit a Portal on the Request Files page. See To edit a Portal
To create a Custom Portal
- In the MASV Web App, in the sidebar on the left, select Request Files with Portals.
- On the Request Files page, do one of the following:
- If this is your first Portal, select Custom Portal.
- If you already have one or more Portals, select the New Portal button, then select Custom Portal.
- On the New Portal page, select the General tab and choose any of the following settings:
- Domain: This is the Portal URL which will be used by your clients to access your custom Portal. You can type a custom URL and share it via email or other communication methods.
- Name: This is the name used to identify your Portal and will be used in the Transfer History and notification emails sent to you and your clients or collaborators who upload to the Portal.
- Email Recipients: Enter email address(es) if you know who the download recipients will be. Please note that each recipient that completes a download counts towards your total usage, and that field is not visible to the client. Please also note that if the field is left blank, no emails are sent when a download occurs. However, all transfers can still be accessed from the Transfer History page.
- CC Recipients: Enter email addresses of people who do not need a download link, but who need a notification that a download has been sent. Ideal for admin and project managers and to notify users who access files delivered to an integration, rather than downloading from a link.
- Message: Type any instructions or restrictions that users will need to know before they upload content. For example, if you set Rules for file type and size, you can reinforce the information here.
- Tag: Add a tag you can use to identify the project for billing or other organization purposes.
- Files Expire After: Set an expiry period for when the files will no longer be available for download via MASV. The number of free storage days varies according to your plan. Any additional days will show their estimated storage cost.
- For more customizations (see Portal customizations), set the properties you want on any of the following tabs:
- Security: Set security-related settings that limit access to Portals and Portal downloads. You can Assign Teamspace, Set as Private Portal: [Note: Feature not available in standard version. Please use Teamspaces to limit Portal access.] , or enforce Upload Security and Download Security with passwords.
- Rules: Set requirements for content collection, such as adding a terms of service agreement, setting file size and type specifications, enforcing a package naming format, or choosing a Portal expiry date.
- Look and Feel: Choose your branding options. For more information, see How to customize a MASV Portal with your brand
- Integrations: Integrate directly with cloud or on-premises storage, cloud collaboration sites, and media asset managers (MAM).
- Custom Form: Create a form that will guide your Portal recipient to provide the metadata you need to organize the transfers.
- When you have finished customizing your Portal, select the Create button in the lower right corner of the page.
- Do one of the following in the Your Portal is Ready window:
- To use the new Portal immediately, you can follow the instructions to request files (Copy Portal URL or email with Send Upload Request).
- Select Finish, and access your Portal from the Request Files page. Select the menu icon
 in the Actions column to preview your Portal (Open Portal Page) or to send an upload request (Send Upload Request).
To duplicate a Portal
- In the MASV Web App, in the sidebar on the left, select Request Files with Portals.
- On the Request Files page, select the menu icon in the Actions column for the Portal that you want to copy.
- From the menu, select Duplicate.
- Edit the Portal settings as needed. Two fields to consider editing:
- Domain: A unique domain is required. If you don't edit the domain, it defaults to the original Portal domain with a unique number sequence appended.
- Name: If you don't edit the Name, it defaults to the original Portal name, with -copy appended.
Note: Passwords are not included when you duplicate a Portal. Please check and set security settings, including passwords, on duplicated Portals.
To embed a Portal on a webpage
- In the MASV Web App, in the sidebar on the left, select Request Files with Portals.
- On the Request Files page, select the menu icon in the Actions column for the portal that you want to embed on a webpage.
- From the menu, select Embed.
- From the Embed your Portal window, choose the settings you want.
- Select Copy to copy the embed code and add it to your webpage, adjusting sizing as required.
To edit a Portal
- In the MASV Web App, select Request Files with Portals in the sidebar on the left.
- On the Request Files page, select the menu icon in the Actions column for the Portal that you want to edit.
- From the menu, select Edit.
- Edit any of the portal settings on any of the tabs and select Save in the bottom right corner to apply the changes.
To delete a Portal
- In the MASV Web App, select Request Files with Portals in the sidebar on the left.
- On the Request Files page, select the menu icon in the Actions column for the Portal that you want to delete.
- From the menu, select Delete.
- In the confirmation window, select Delete.
Note: Deleting a Portal does not delete the file transfers associated with the Portal. To delete file transfers, in the MASV Web App, go to the Transfer History page, select the file transfers that you want to delete, select the corresponding menu icon ![]() in the Actions column, and select Delete Package.
in the Actions column, and select Delete Package.
Portal customizations
In addition to the settings you choose on the General tab, you can customize your Portal with the following security, rules, branding options, integration settings, and custom form fields. The following customizations are available from the New Portal and Edit Portal pages:
Security
- Assign Teamspace: Only Member users (role) who are assigned to the selected Teamspace have access to the Portal. Owner and Admin users always have access.
- Upload Security: Enable Password protection if you want to set a password that must be entered by portal recipients before they can upload to the portal. For information about additional upload security, including requiring single sign-on (SSO) and authentication options, please contact sales@masv.io.
- Download Security: Enable Password protection if you want to set a password that must be entered before users can download a package delivered via the Portal. The password requirement will be visible only to those who access deliveries sent to the Portal. For information about additional download security, including requiring single sign-on (SSO) and authentication options, please contact sales@masv.io.
For more information about options on the portal Security tab, see Portal security.
Note: Users are locked out of a Portal after five incorrect password attempts and are instructed to contact the Portal owner.
Note: Older accounts might have access to another option: Set as Private Portal. This feature has been replaced by Teamspaces and user authentication.
Upload Rules
- Terms of Service: Add a terms and conditions agreement. When active, the user must acknowledge the terms and conditions, contest rules, or other messaging before they can submit content to the Portal. You can copy and paste your terms of service into the Description box or use the Description box to direct users to the URL you provide.
- File Specifications: Set a maximum package size or specify the file formats that you want to receive. Packages that don't meet the criteria are not uploaded to the Portal.
- Package Name Format: Enforce a naming convention for files uploaded to the Portal. For example, you can ensure packages use a standard naming format, such as [date]-[project]-[ID]-[resolution]. Package name formatting is defined by Regular Expression (also known as RegEx). For more information, see How to set a package name format in MASV.
- Portal Expiry: Choose a date for when the Portal becomes inactive. For example, if running a contest, you can set the Portal to expire (Portal becomes "Inactive") when the contest closes.
Note: You cannot automate a Portal that uses Rules.
Look and Feel
- Logo: Add a logo to reflect your organization. This logo will be shown on email notifications as well.
- Background: Choose a background image to reflect your brand or something related to the project. This will be seen by anyone who accesses the Portal via the Domain URL.
- Accent Color: Choose a color for the logo banner and buttons. The color is used for Portals and email notifications.
For more information, see How to customize a MASV Portal with your brand
Integrations
- Send and receive files using integrated cloud or on-premises storage, collaboration services, or asset management software. Select from the MASV list of integrations, and in the Add Integration window, authenticate the integration and select Connect. For more information about Portal integrations, see How to use a MASV Portal to send files to integrations.
Custom Form
- Get the metadata you need from senders by adding a custom form. The sender is prompted to fill in the form, and MASV includes this metadata with any files they send to you. By choosing a compatible delivery format, you can use this information to track your transfers or integrate with your media asset management (MAM) platform. For more information, see How to design a form to collect metadata.
Note: You cannot automate a Portal that uses Custom Forms.