You can design a custom metadata form when you create or edit a MASV Portal, or you can create a Metadata Form template that you can reuse and apply to any Portal.
By default, a Portal has three Form Fields (Sender Email, Package Name, Package Description). The metadata entered in these fields is delivered via the email that includes the download link. When you create a Custom Form, you can change:
- Fields included
- Field format (text box, checkbox, dropdown list, hyperlink, radio button, etc...)
- Field setting: Required, Optional, Read Only, or Hidden
- Delivery format (Email, JSON, CSV, XML)
You can preview your form, save it as a template, and clear the form if you want to start from scratch. Each Portal has its own form, so any changes made on the Custom Form page are only captured for that Portal. If you save the form as a template, you're capturing a copy of that instance of the form.
To create a Custom Form to collect metadata with a MASV Portal
- In the MASV Web App, as a Team Owner or Admin (roles) , select Request Files with Portals from the sidebar on the left.
- Do one of the following:
- On the New Portal or Edit Portal page, select the Custom Form tab.

- Do one of the following:
- If no customization has been made previously, select Create new Custom Form.
- If you want to use a form template (previously saved), select Start with a form template, and select the form you want from the list.
- In the Form Name field, type a name that reflects the purpose of the form.
- In the Delivery Formats area, select the check boxes for the metadata delivery methods you want: JSON, CSV, XML, and Email Body.

- In the Form Fields area, add, edit, delete, or rearrange any of the form fields you want. See Working with Metadata Fields for information about modifying form fields.
- Select the Save button in the lower right corner of the page to apply your changes.
- Select Preview at the bottom of the page and test your form. If you make any adjustments, don't forget to select the Save button again to apply the changes.
- If you want to save the form as a template, at the bottom of the page, select Save form as template. The form is saved as a metadata form and available from Features & Settings > Metadata Forms.
Note: You can reset a Custom Form for a Portal from the Edit Portal or New Portal page by selecting Clear this form from the portal at the bottom of the page.
Note: You can turn a Portal form off or on from the Edit Portal or New Portal page by selecting the Enable this form toggle in the Delivery Formats area.
Working with Metadata Fields
When designing a form, you can add, delete, edit, and rearrange fields. Most fields are straightforward to configure. Multi-selection options, such as checkboxes, radio buttons, and dropdown menus require some additional configuration.
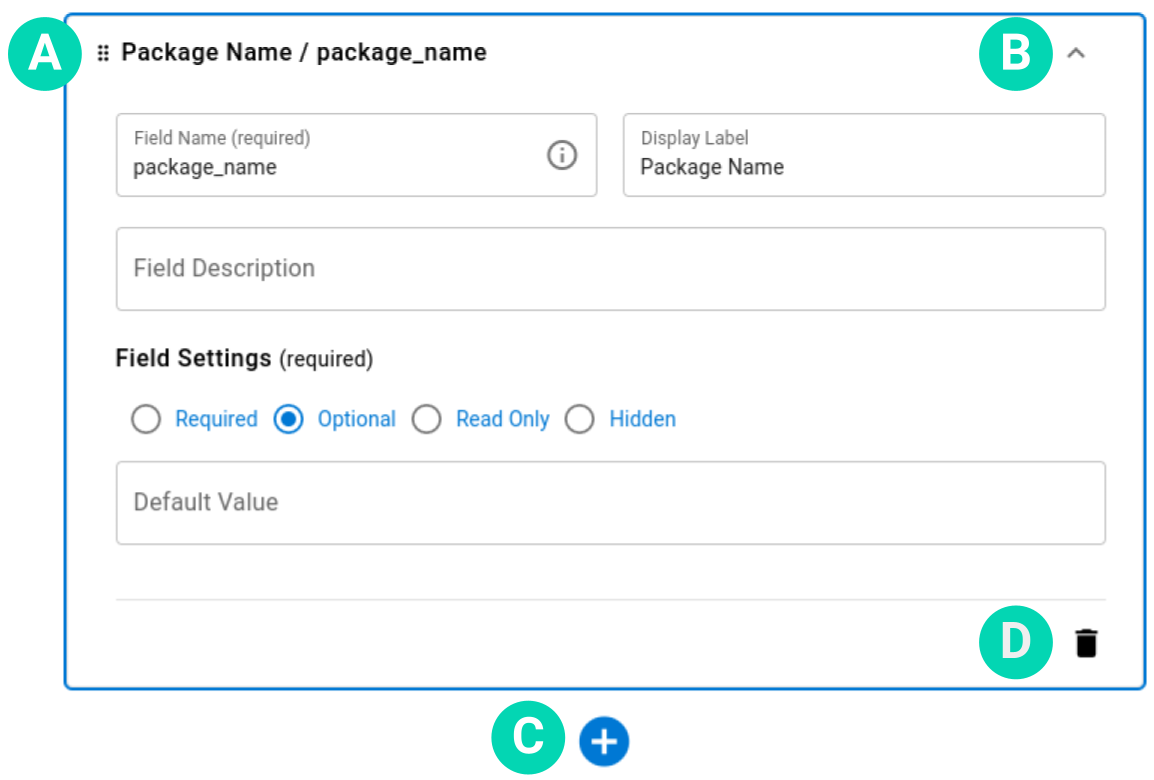
- A: Drag the field up or down to arrange a form’s fields in the order you want.
- B: Select to hide or show the field’s settings. You can also select Collapse or Expand to see an overview of all fields or details for each field.
- C: Select + to add a new field, then choose the type of field you want to add.
- D: Select the field you want to delete, select the trash button, then confirm your decision. Deleting a field can’t be undone!
To create a Checkbox, Radio Button, and Dropdown Select field
- In the Add a field window, select one of the following:
- Checkbox
- Radio Button
- Dropdown Select
- In the field box, enter the following information:
- Field Name: Internal name that you want to use for the data key.
- Display Label: Field label that displays above the field box or options.
- Field Description: Instructional or descriptive text that appears below the Display Label.

- Select the Add/Edit Options link to open the Edit Options window.
- Select the Add option button, and type the option you want in the Value box.
- Repeat the step above until you have entered all the values you need.
- If you want to sort the values, select the Sort button to choose ascending or descending order (alphanumeric order).

- Select Done.
- In the Field Settings area, select an option.
- If you want to set a default value, in the Default Option box, select a value.
- When you're done, select Preview in the lower left corner of the page and test your form.
- When you're satisfied, select the Save button in the lower right corner of the page.
Managing Custom Form templates (Metadata Forms)
You can save the Custom Forms from your Portals as templates and reuse them for new Portals. You can also create a form template from scratch and save it until you are ready to apply it to a Portal. For example, if you are preparing for a project and know the fields you'll need before you create Portals for your contributors, you can create and save your template as a Metadata Form.
To view or create Metadata Form templates
- In the MASV Web App, as a Team Owner or Admin (roles) , select Features & Settings from the sidebar on the left, and select Metadata Forms.
- On the Metadata Forms page
Use the Actions dropdown menu to do these things:
- Preview: See what a Portal’s custom metadata form looks like to Portal senders. You can also export sample metadata files.
- Duplicate: Make a copy of the metadata template.
- Edit: Edit the template’s metadata file formats and fields.
- Delete: Delete the template. Deleting a template can’t be undone!
Editing a template doesn’t affect existing custom forms in Portals. Changes you make in Metadata Forms apply only to new custom forms.