How to control access with MASV Teamspaces
Create groups within a MASV Team by using Teamspaces
A MASV Team lets you manage users, security, and access. As a Team Owner or Admin, you can use Teamspaces to organize team users into groups. What can you do with Teamspaces?
- Create a Teamspace for a project, client, department, and so on.
- Control access to files sent to specific portals.
- A Team can have as many Teamspaces as you need.
- Combine with Tags for an extra level of project tracking and billing.
- See Transfer History and billing for each Teamspace.
- Apply credits bought for a team to any of its corresponding Teamspaces.

To create a Teamspace
- As a Team Owner or Admin, log in to the MASV Web App.
- In the sidebar on the left, select Features & Settings, and Teamspaces.
- On the Teamspaces page, do one of the following:
- For your first Teamspace, select Get Started.
- If you already have Teamspaces, select New Teamspace.
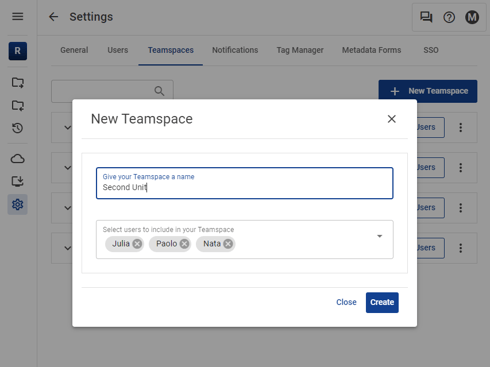
- In the New Teamspace window, type a name for your Teamspace in the Give your Teamspace a name box.

- In the dropdown menu, select the users that you want to include in the Teamspace. You don't need to add Owner or Admin users, they can access any Teamspace.
- Select Create.
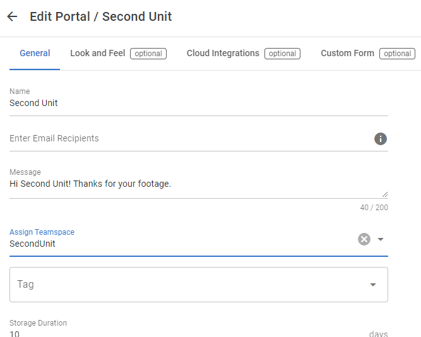
- Optional: Assign Portals to the Teamspace. For more information, see How to create, edit, or delete a Portal.
Control access to transfers and Portals with Teamspaces
To control the transfers that users can access, you can add or remove them from a Teamspace:
- Member users cannot access transfers in Teamspaces they aren’t assigned to.
- You can assign a user to more than one Teamspace, or none at all.
- All Member users can access transfers that aren’t associated with a Teamspace.
- Anyone can upload files to a Portal assigned to a Teamspace, but only the Teamspace users can download these files.
- Owners and Admins can always access any Teamspace in the Team, whether or not they are assigned to it.
- Integration Manager users can’t access transfers in Teamspaces or the Team.
💡 For information on all roles and their permissions, see What user roles are available in MASV?.
Example
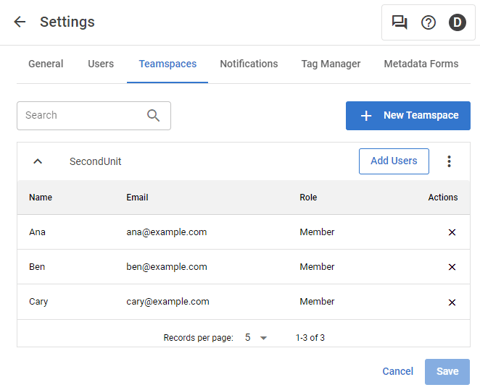
In this example, a Team includes Ana, Ben, and Cary who are Member users:

These users can download files that are sent these portals:
|
Portal A |
Portal B |
Portal C |
|
|
Ana |
✓ |
✓ |
|
|
Ben |
✓ |
✓ |
✓ |
|
Cary |
✓ |
✓ |
|
|
Owner and Admins |
✓ |
✓ |
✓ |
To add and remove users from a Teamspace
- Sign in to the MASV Web App as a Team Owner or Admin.
- In the sidebar on the left, select Features & Settings, and Teamspaces.
- On the Teamspaces page, do any of the following:
- To add users to a Teamspace, select Add Users.
- To delete users from a Teamspace, in the Action column, select X.
Send and receive files with Teamspaces
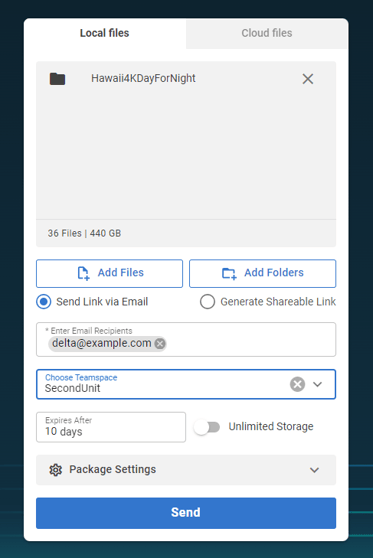
You can send files with the MASV Web App or MASV Desktop App to a specific Teamspace: How To Send Files Using MASV.

And you can assign a portal to a Teamspace: How do I create a Portal.

Viewing transfers and billing by Teamspace
You can review transfers associated with your Teamspaces by filtering your Transfer History.
For billing, teamspace information appears on both the Billing Log and the Invoice Log. For information about exporting a billing report, see How to export and read your billing log report
For information about invoice reports, see How can I export invoices?
To filter transfers by Teamspace
-
In the MASV Web App, select Transfer History in the sidebar on the left.
-
On the Transfer History page, select the Sent or Received tab.
-
Select the Advanced Filters button
 .
. -
Select Teamspaces from the categories that display, and choose a Teamspace from the dropdown menu.
Delete a Teamspace
You can delete a teamspace that you no longer need. Before deleting, keep these things in mind:
- Deleting a teamspace does not delete the users, transfers, or portals associated with it.
- Transfers that were associated with the deleted teamspace become accessible to all users on the team.
- New uploads to a portal that was assigned to the deleted teamspace will belong to the team—any user in the team can access. Consider assigning the portal to another teamspace to control access.
- Transfer History and exported CSV files will not show the deleted teamspace for transfers.
⚠️ Deleting a teamspace cannot be undone.
⚠️ Transfers that were associated with the deleted Teamspace are no longer associated with a Teamspace, making them accessible to all users on the Team.
To delete a Teamspace
- Sign in to the MASV Web App as a Team Owner or Admin.
- In the sidebar on the left, select Features & Settings, and Teamspaces.
- In the Options ⋮ menu for the Teamspace, select Delete.
- Select Confirm.

