MASV lets you send files and folders located on your local computer, device, shared network drive, and qualifying integrations, such as storage devices (NAS, SAN,...) or some cloud services (Amazon S3, Wasabi, Other S3). You can also send packages that are currently stored in MASV.
This page includes the following topics:
- Overview
- Send local files with the MASV Web App
- Send files from integrated cloud and on-premises storage devices
- Send with the MASV Desktop App
- Send packages already in MASV
Overview
And there are a few ways to send files:
- MASV Web App: Convenient for sending a few files or folders at a time, sending from cloud storage, storage devices, or sending packages already in MASV.
- Portals: Using a MASV Portal is a simple, convenient way for anyone to send files to you. You can save these files to local storage, a cloud location, or a storage device.
- MASV Desktop App: Best for many files or folders on your local computer or shared network drive. The MASV Desktop App is faster than the MASV Web App. You can pause, prioritize, or change the order of transfers, and you can automate transfers. It’s also more reliable if you have an intermittent internet connection. Download and install the MASV Desktop App for macOS, Windows, or Linux.
You can notify your recipients in a couple of ways:
- Send a link yourself. This is useful when you don’t have the recipients’ email addresses, you want to send to a lot of recipients, or you don’t need to track each of their downloads.
- MASV emails the recipients for you. It also tracks each of their downloads. You can see their activity in Transfer History in the Web app.
Keep in mind
- MASV preserves folder structure so that your recipients get exactly what you see on the screen.
- After you’ve signed up there is no limit to the number of files and folders that you can send. Individual file size limit depends on the destination, so confirm limits enforced by your destination. MASV supports multi-terabyte files.
- While sending, don’t change the file or folder that you included in the package--this will cause errors.
- Avoid zipping. MASV does this for you in a way that’s lossless, preserves the integrity of your data, and is compatible across platforms.
Send local files with the MASV Web App
The MASV Web App has a Send card that you can use to drag and drop or navigate to local files that you want to upload and send. If you add email recipients in the Send card, each email recipient will receive an individualized link that they can use to download the package. If you don't include any email recipients, a link is generated and you can copy and paste the link via messaging services, text, or however you want. Keep in mind that this type of link is not individualized, so the tracking and Max Downloads per Link setting need to be considered (the more people using a single link, the more downloads you need to permit).
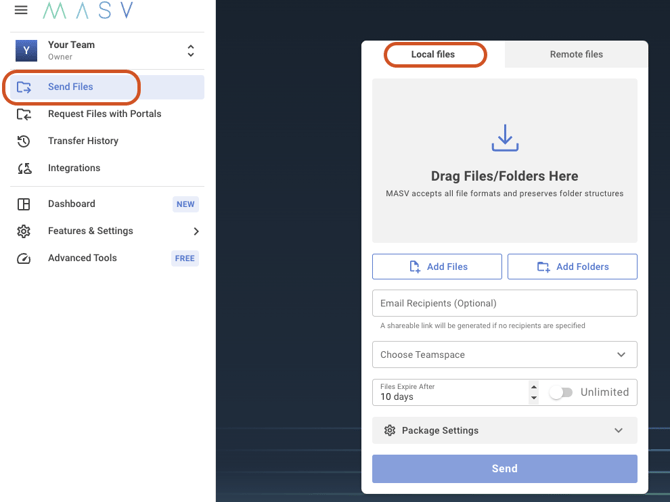
To send local files with the MASV Web App
- In the MASV Web App, from the sidebar on the left, select Send files.
If you have more than one Team, select the Team you want from the top of the sidebar. - Select the Local files tab, and do one of the following:
- Drag and drop your files and folders onto Drag files/folders here area of the Send card.
- Select the Add Files or Add Folders button and navigate to the files or folders you want to send.
Tip: Before sending, you can browse any folders (including subfolders) you've added to the Send card to verify the files. Your recipients will also be able to browse folders before downloading.
- (Optional) In the Choose Teamspace box, specify a Teamspace if you have created Teamspaces for your Team.
- (Optional) In the Files Expire After box, adjust the default storage duration. You can increase or decrease the number of days, or set the storage to Unlimited. The number of free days of storage depends on your plan (minimum free days is 5).
Note: After files expire, the files are deleted from MASV storage and are no longer available for download. For security, privacy, and to minimize costs, MASV does not retain copies of expired files. - (Optional) In the Package Settings area, specify any of the following:
-
Package name: Give your package a distinctive name. If you leave this empty, MASV names your package according to your Team name, date, and time.
-
Message: Let your recipients know extra details about what you’re sending.
-
Max Downloads per Link: This specifies the maximum number of times each Email Recipient can download a package via their download link. For shareable links, it specifies how many times the shareable link can be used to download the package. Remember that you pay for downloads, so you can use this option to minimize costs associated with extra downloads.
-
Tag: Assign a keyword to this package. You can use this tag to filter and sort in Transfer History and keep track of billing. You can manage tags in Features & Settings > Tags.
-
Download password: Require recipients to also enter a password before downloading. You’ll need to send this password to your recipients yourself, MASV doesn’t send it for you. Also, MASV doesn’t remember this password so you need to remember it.
-
- Select Send. MASV shows its progress as it uploads.
Important: Remember not to close the browser or its tab before the upload finishes. Also, make sure your computer doesn’t sleep during the upload. - If you are want to use a shareable link (did not enter Email Recipients), when the upload finishes, select Copy Download Link to copy the link to your Clipboard.
Tip: You can also copy this link in Transfer History > Sent.
Send files from integrated cloud and on-premises storage devices
You can use MASV to send files and folders from cloud locations and storage devices.

To send files from MASV integrations
- In the MASV Web App, from the sidebar on the left select Send Files.
- Select the Remote files tab, and then select Add Remote Files.
- In the Select Integration window, select an integration from the list, and select Confirm.
If you don’t see the integration you want, you can create a new integrations by selecting New Integration and following the instructions. For more information about available integrations, see What integrations does MASV support? - Navigate to the files and folders that you want to send, mark the checkbox next to the content you want to send, and select Confirm.
- Note: Files within directories are not displayed by default. Select the Load Contents button in the upper right corner to view files. Your recipients will be able to navigate the folder and its subfolders before downloading.
- (Optional) In the Email Recipients box, type the email addresses of your recipients. You can leave this blank if you want to generate a link that you can share in other ways.
- (Optional) In the Choose Teamspace box, select a Teamspace.
Note: You need permission to access and choose a Teamspace. - In the File Expire After box, choose how long you want to store the files on the MASV Cloud before they are deleted. The number of free days included in your plan is usually the default setting. If you extend the storage days or choose Unlimited, storage fees apply, based on your plan. For more information, see How Extended Storage works and what it costs.
Important: Deleted packages can’t be restored! - (Optional) Fill in any of the following Package Settings:
- Package Name: Give your package a distinctive name. If you leave this empty, MASV names your package with your team and the current date and time.
- Message: Let your recipients know extra details about what you’re sending.
-
- Max Downloads per Link: The maximum number of downloads per recipient. For recipients specified by email, this specifies how many times each email recipient can download a package. For shareable links, it specifies how many times the shareable link can be used to download the package. Remember that you pay for downloads, so you can use this option to limit how much you pay. The default is 3.
- Tag: Assign a keyword to this package. You can use this tag to filter and sort in Transfer history and keep track of billing. You can manage tags with Tag manager.
-
- Download Password: Require recipients to also enter a password before downloading. You’ll need to send this password to your recipients yourself, MASV doesn’t send it for you. Also, MASV doesn’t remember this password so you need to remember it too.
- Select Send.
MASV shows its progress as it transfers from cloud storage to MASV. - If you did not enter Email Recipients, copy the download link by selecting the clipboard icon.
You can also find this link in Transfer History > Sent.
Tip: You can also send files directly from the Integrations > My Integrations page. In the Actions column beside the integration you want to access, select Send Files from the drop-down menu. Navigate to the files you want to send.
Send with the MASV Desktop App
The MASV Desktop App supports sending files and folders from your local computer or shared network drive. To send from cloud storage or packages already in MASV, use the MASV Web App.

💡You can also automate sending files. See How to set-up MASV Watch Folders.
To send files with the MASV Desktop App:
- Launch the MASV Desktop App.
- Do one of the following:
- To send to a recipient: Sign-in then select Send.
- To send to a Portal: Select Send to Portal, fill in the Portal’s URL, and select Continue. You don’t need to sign-in to send to a Portal.
- Drag and drop your files and folders from your local computer or shared network drive. Or you can select + Files or + Folders.
- Optionally fill in package options by expanding the gear icon:
- Team: Choose the team you want to send from.
-
- Teamspace: Select a Teamspace. Note: You need permission to access a Teamspace to choose it.
- Download password: Require recipients to also enter a password before downloading. You’ll need to send this password to your recipients yourself, MASV doesn’t send it for you. Also, MASV doesn’t remember this password so you need to remember it.
- Package name: Give your package a distinctive name. If you leave this empty, MASV names your package with your team and the current date and time.
- Message: Let your recipients know extra details about what you’re sending.
- Tag: Assign a keyword to this package. You can use this tag to filter and sort in Transfer history and keep track of billing. You can manage tags with Tag manager.
- Download limit: The maximum number of downloads per recipient. For recipients specified by email, this specifies how many times each email recipient can download a package. For shareable links, it specifies how many times the shareable link can be used to download the package. Remember that you pay for downloads, so you can use this option to limit how much you pay. The default is 3.
- Storage duration: Adjust the default storage duration. You can increase or decrease the number of days, or select Enable unlimited storage. The number of free days of storage depends on your plan.
Note: After files expire, the files are deleted from MASV storage and are no longer available for download. For security, privacy, and to minimize costs, MASV does not retain copies of expired files.
-
- Priority: Choose how important this transfer is. The Desktop app transfers higher priority packages before packages with lower priority. This option is available only when using Transfer by Priority.
- Choose how to send and notify your recipients:
- Send as email: Fill in the email addresses of your recipients.
- Send as link: Copy the link to the clipboard to share with your recipients however you want.
- In Share download link, copy the download link by selecting the clipboard icon.
You can also open this link in a browser or copy it from the list of transfers.
Send packages already in MASV
You can download or send packages that you have already received or sent. You can only download or send packages that haven’t expired. You can do this from the Transfer History in the MASV Web App.
Team owners and administrators can send all packages in MASV. Members can send any received package and resend their own sent packages.
To send packages already in MASV
- In the MASV Web App, select Transfer History from the sidebar on the left.
- On the Transfer History page, select the Sent or Received tab.
- In the list of packages, filter, sort, or search for the package you want to download or send.
- Do one of the following:
- In the Package Name column, select the package name.
- Select the vertical ellipse button in the Actions column, and select Package Details from the drop-down menu.
- On the Package Details page, do any of the following:
-
- To download: Select Download Package.
- To get a download link: Select Get Download Link and fill in the details.
- To notify recipients by email: Select + Add a Recipient list and specify the information you want in the Add a Recipient window.
- To send to your cloud storage: Select + Save to Cloud, and in the Select integration window, select the integration you want.
-