How to connect to MediaSilo
Step-by-step guide to integrate MASV with your MediaSilo project
MediaSilo lets you store, collaborate, present, and analyze your video production assets. You can let your remote collaborators upload to your MediaSilo project by connecting it to a MASV Portal. Your collaborators don't even need an account with MediaSilo or MASV.
As a MASV user, you can also send MASV packages to your MediaSilo project from the MASV Web app’s Transfer History.
You can request metadata from your collaborators to include it in your MediaSilo project.
Each file that you send to MediaSilo can be up to 30 GB. There is no limit on the number of files that you send from MASV to MediaSilo.
First, Set Up Your MediaSilo Project
To transfer files from MASV to MediaSilo, you need to do the following:
| Do This | For More Information |
| Create a MediaSilo project to receive files from MASV. | Create and Manage Projects |
|
Assign a MediaSilo user to the project. This user must have these permissions for the project: View, Delete, Edit, Upload. |
Permissions |
| Get a MediaSilo API key and secret for the MediaSilo user. | Auth |
💡 We recommend that you create a MediaSilo user that you dedicate only to receiving files from MASV. From example, create a MediaSilo user named MASV that you assign only to the projects that you want to receive from MASV. This way, you can reduce security risks and your other MediaSilo users won't be affected.
Next, Connect MASV to MediaSilo
To let your collaborators send files to your MediaSilo project, you first add a MASV cloud integration for your MediaSilo project, then add this cloud integration to a MASV Portal.
To add a cloud integration, you need to be a MASV team owner or admin.
Adding a MediaSilo Integration

- Log in to your MASV account.
If you don't have an account, you can sign up for free. - In the left sidebar, select Cloud Integrations then New Integration.
- In Select Service, choose MediaSilo.
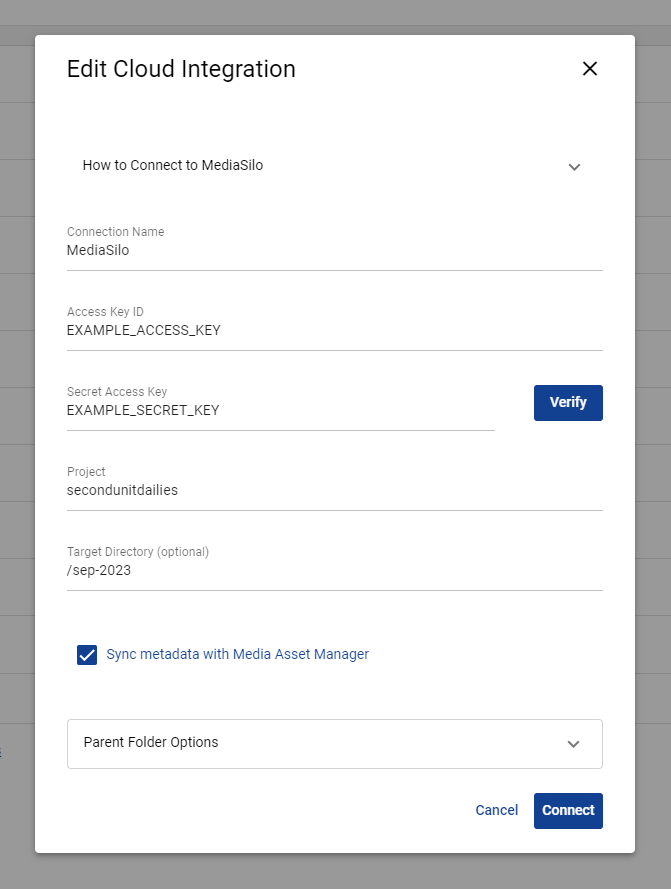
- Fill in Connection Name.
- Copy then paste the MediaSilo authentication information in Access Key ID and Secret Access Key.
- Choose a Project.
- Optional: Choose a Target Directory.
The default is to store files in the top level of the project. - Optional: Check Sync Metadata with Media Asset Manager to include MASV's metadata in the MediaSilo assets. See Getting and Integrating Metadata.
- Optional: In Parent Folder Options, choose how MASVS stores files in the MediaSilo project:
- Check Save directly in upload/target directory: MASV creates a new sub-folder Target Directory that has the name of the MASV package.
- Uncheck Save directly in upload/target directory: MASV stores files in Target Directory, with any other files that are already there.
Adding MediaSilo to a Portal
You can set up a MASV Portal so that packages that you receive in MASV are also transferred to MediaSilo:
- In MASV, select Request Files in the left sidebar.
- Find the Portal that you want and choose Edit from the Actions column.
- Select the Cloud Integrations tab.
- In the Status column, enable your integration for MediaSilo.
- Select Save.
Sending to MediaSilo
You and your collaborators can use MASV to send files to your MediaSilo project:
- Send with a MASV Portal connected to your MediaSilo integration. Metadata fields that you collect from a MASV Portal appear in the Custom section of the metadata for the file in MediaSilo.
- In the MASV web app's Transfer History page, choose Save Package to Cloud from the Actions drop-down menu.