You can integrate MASV with your on-premises storage, such as NAS (network-attached storage) and SAN (storage area network) devices, as well as cloud block storage. For example, you can integrate MASV with your Amazon EC2 (Elastic Compute Cloud) storage, such as Amazon EBS (Elastic Block Storage) and Amazon EFS (Elastic File Storage). With the addition of MASV Storage Gateway technology, MASV evolves from an amazing file transfer solution into an ideal central ingest solution.
This Help page provides an overview of what you need to know about integrating and managing a storage device integration in MASV.
Specific instructions are available for the following storage options:
This page includes the following topics:
What do you need to make it happen?
To integrate a storage device with MASV
To edit the Target Directory or Parent Folder for a storage device
To rename a storage device integration
To delete a storage device integration
To refresh a storage device connection
What do you need to make it happen?
The following list includes what you need to get started:
- A target storage device: This can be an on-premises storage device, typically a NAS, SAN, or computer used as a server. It can also be a virtual storage device, for example, storage connected to an Amazon EC2 instance (Amazon EBS or Amazon EFS). The device must be running a platform supported by the MASV Agent (see description below).
- MASV Web App: You need to be an account Owner, Admin, or Integration Manager (role).
- Terminal interface: Your target storage device needs to have a terminal app or terminal interface available in order to set up and manage the connection.
- MASV Agent: You must install the MASV Agent on the storage device, either in advance or by following the prompts in the MASV Web App. The MASV Agent is available for Linux (see note below about SELinux), Windows, macOS, and Docker platforms. For more information about installing the MASV Agent, see https://developer.massive.io/transfer-agent/latest/. The exception is if you're connecting desktop mounted storage--you can use a simplified connection method using the MASV Desktop App. For more information, see How to connect desktop mounted storage.
Note: After the MASV Agent is installed, you can use the MASV Agent CLI (Command Line Interface) in a Terminal app to manage connections and transfers.
Note: If you are running SELinux (Security-Enhanced Linux) with Docker, please consult your system administrator to ensure it is configured to allow MASV transfers.
It starts in the MASV Web App
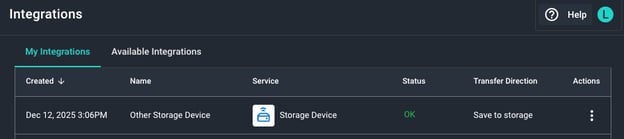
You can create and manage storage device integrations in the MASV Web App. When you integrate a storage device, you create a registered connection that includes an ID and Secret key. Each connection is directional, so you can create more than one connection for a storage device. For example, you can create a connection to save files to storage (write) with an inbound connection and also create a connection to send files from storage (read) with an outbound connection. The name you choose and the transfer direction display on the My Integrations page, along with the creation date and status of the connection. You can rename or delete a connection from the My Integrations page. You can also edit the relative path for your integration by changing the Target Directory and Parent Folder Options.
Tip: Portals offer custom path settings for integrations that let you append subdirectories to the path to further control where files are delivered. For more information, see How to use a MASV Portal to deliver files to integrations.
Adding UserID and GroupID
If the files that you write to a storage device need to be owned by someone other than the root user, in Linux systems you have the option to add user ID (uid) and/or group ID (gid). You can do this when you register your connection or you can add the information later using the MASV Agent CLI (Command Line Interface) for MASV Agent. For Docker installations, see the MASV Agent Docker Setup guide.
Security considerations
Connections to storage devices are protected by a Secret key, authentication processes, as well as encryption of traffic between storage and MASV.
Firewall considerations
Please review the port, host name, and IP address information to ensure your firewall is configured properly for MASV transfers: How to ensure your firewall works with MASV.
To connect a storage device to MASV
- In the MASV Web App, as Team Owner, Admin, or Integration Manager (role), select Integrations from the sidebar on the left.
- From the Integrations page, select the Available Integrations tab, and select Storage Device.
 In the Add Integration window, type a name in the Connection Name box.
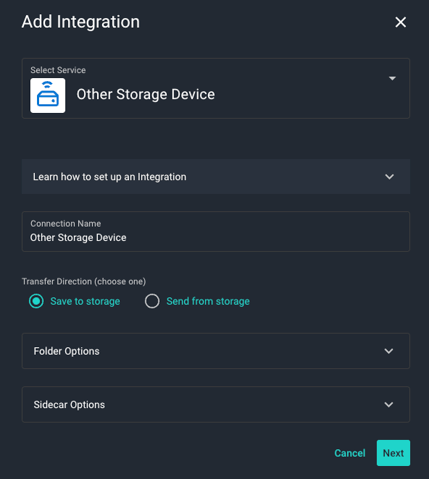
- In the Transfer Direction area, choose a direction:
- Save to storage: For inbound files (Write)--MASV transfers files to the storage device.
- Send from storage: For outbound files (Read)--MASV transfers files out of the storage device.
- Choose any of the following settings in Folder Options:
- (Optional for Save to storage)To set a relative path, type a path in the Target Directory box. You can edit this directory from the MASV Web App as needed.
- (Optional for Save to storage) If you want to save the files in a directory that uses the package name, clear the checkbox. To deliver directly into the Target Directory, select the checkbox.
- (Optional for Send from storage) To limit access to a specific folder/directory, in Source Directories, type a relative path. You can edit this directory from the MASV Web App as needed.
- In Sidecar Options, select the sidecar options you want if you want to pass a manifest file for the transfer.
- Select Next.
- In the Register Integration window, if you have not already installed the MASV Agent on your storage device, select the Install MASV Agent button, select the installation for your platform, and follow the installation instructions.
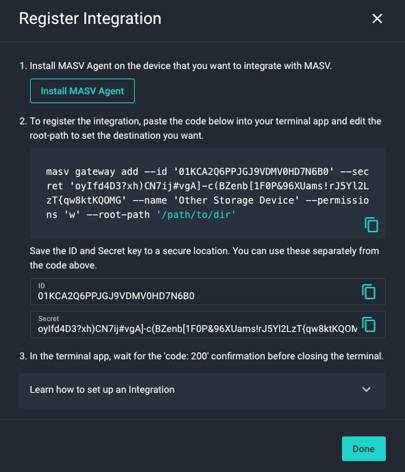
- In the Register Integration window, copy the block of code provided and paste it into the device’s Terminal window.
- In the Terminal window, edit the placeholder text ('/path/to/dir/') for the root-path to point to a pre-existing directory that you want to access.
- (Optional for "Save to storage") If you want to add UserID (UID) and/or GroupID (GID) information, at the end of the code block, append the following code, replacing the bracketed placeholders with the IDs you want:
--uid <uid>and/or--gid <gid> - Press Enter, and when the Terminal window responds with Code: 200, select the Done button in the MASV Web App .
- Your new integration displays in the list on the My Integrations tab. The status will indicate OK if the connection is successful and ready to use. You might need to refresh the page to update the connection status.
Important: The MASV Status column does not indicate when a target device is unavailable in all scenarios (stopped, off, removed...), so check that your destination device is available for transfers.
Notes for Docker
- If you're running the MASV Agent with Docker, you must execute `masv` or `curl` commands within the container.
- When setting your root-path, it needs to be relative to the shared directory you created in Docker. For example,
/data/.See our Docker setup guide for more details.
To edit the Target Directory or Parent Folder Options for a storage device
- In the MASV Web App, as Team Owner or Admin (role), select Integrations from the sidebar on the left.
- From the Integrations page, select the My Integrations tab.
- In the Action column for the integration that you want to edit, select the Action icon
 , and select Edit.
 - In the Edit Integration window, change the Target Subdirectory or Parent Folder Options.
- Select Next to apply the changes.
To rename a storage device integration
- In the MASV Web App, as Team Owner or Admin (role), select Integrations from the sidebar on the left.
- From the Integrations page, select the My Integrations tab.
- In the Action column for the integration that you want to rename, select the Action icon , and select Rename.
- Type a new name for the connection and select OK.
To delete a storage device integration
- In the MASV Web App, as Team Owner or Admin (role), select Integrations from the sidebar on the left.
- From the Integrations page, select the My Integrations tab.
- In the Action column for the integration that you want to delete, select the Action icon , and select Delete.
- Type a new name for the connection and select OK.
To refresh a storage device connection
- In the MASV Web App, as Team Owner or Admin (role), select Integrations from the sidebar on the left.
- From the Integrations page, select the My Integrations tab.
- In the Action column for the integration that you want to refresh, select the Action icon , and select Edit.
- In the Edit Integration window, select Next. A green confirmation message displays at the bottom of the window if the refresh is successful.
Note: Refreshing a connection is a way to troubleshoot transfer issues that sometimes occur after connection disruptions. For example, if the Status column indicates a storage device connection is Unavailable despite connectivity, refreshing can restore the connection.