Gather Identity Provider Details
You will need to get your Identity Provider’s XML Metadata. This can be provided to MASV via URL or by pasting in the raw XML.
For most IDPs, you will first need to create/register a SAML 2.0 application before getting access to the metadata. This is because your IDP metadata will typically contain information unique to your application.
For some IDPs, you may need to provide MASV’s Service Provider metadata before being able to access IDP metadata. This means you will need to complete the next step and then return to this step.
Provide MASV’s Metadata To Your Identity Provider
You can obtain MASV’s Service Provider metadata from your team’s SSO configuration page using the following steps:
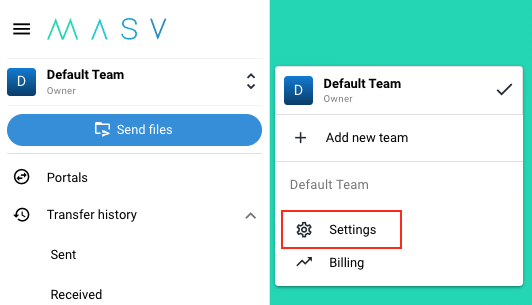
- Ensure you are logged into MASV and that you’ve selected the team you wish to configure SSO for.
- Click the team selector at the top of the left sidebar, and then click “Settings” to navigate to your team’s settings page.
- Once on the team settings page, navigate to the “SSO” tab
If you don’t see the SSO tab, you might not be an administrator on this team. Please contact your team owner to request the necessary access. If you are an administrator but still do not see the SSO tab, SSO may not be enabled for your team.
- Ensure you have ownership of at least one domain verified.
For a guide on domain verification, see: Domain Verification Guide - In the “SSO Configuration” section, copy “SP Metadata URL” value.
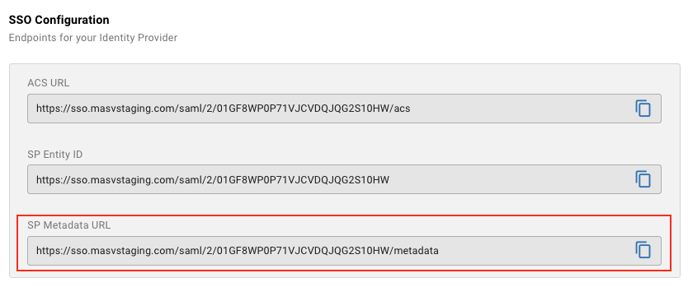
Depending on your Identity Provider, you may be able to provide the URL without needing to download or open the metadata. However, you may need to upload a file or paste some XML into an input field. To download the metadata file, you can navigate to the link and save the file for upload into your Identity Provider. You can also open this file, copy the XML, and then paste it into your Identity Provider.
Import Identity Provider Metadata Into MASV
The execution of the following steps will depend on how your Identity Provider provided it’s metadata. MASV supports importing metadata via URL or by pasting in raw XML metadata.
- Navigate to your MASV team’s SSO configuration page
- If your Identity Provider gave you a metadata URL, paste it into the SAML Configuration “Metadata URL” field.
- If your Identity Provider gave you raw XML metadata, paste that into the SAML Configuration “Raw Metadata” field.
- Click “Save” in the bottom right.
- If valid metadata was imported, your SAML Configuration should now display as active.
- You should now see an “SSO Name” field at the top of the right side of the page. This is where you choose the name your users will use to log into your team with SSO. For example, if you entered masv, your users would enter masv as the SSO Name on the SSO login page.
- Once you have chosen and entered an SSO name, click the switch for “Enable SSO.”
You will see an option to enable or disable “Require login with SSO.” If you disable this, you can allow users to sign into MASV with SSO or email authentication. - Click “Save” once again. SSO configuration is now complete.
Mapping Attributes
MASV requires a number of user identity attributes to be mapped within your Identity Provider in order to process SSO requests. Refer to the table below:
| Attribute Name | Value |
| saml_subject | The name of your identity provider. For some identity providers, this can be set automatically (e.g PingOne), but for others you may need to set a hardcoded string in this field. For example “okta” if Okta is your identity provider. |
| The user’s email address. This should be their primary login email. | |
| name | The user’s name. This can be their first name, first name + last name, username, or whatever other attributes are available within your identity provider. |
Putting It All Together
Ensure you have completed the following:
- Completed your application setup within your Identity Provider
- Imported MASV’s Service Provider metadata into your Identity Provider
- Imported your Identity Provider’s metadata into MASV using the team SSO configuration page
- Configured your MASV team’s SSO name
- Completed the required attribute mappings
- Assigned users/groups as necessary within your Identity Provider
Once all the above steps are completed, you should try authenticating with your Identity Provider within MASV.
Navigate to MASV’s SSO sign-in page and enter the SSO name you chose for your team. When you click “Sign in”, you should be redirected to your Identity Provider to authenticate. Once you’ve finished authenticating, you should be redirected to MASV.
If you are redirected to the MASV dashboard, great! You can continue using MASV as usual. If you are redirected to a screen prompting you to accept an email invitation, please do so and then sign back in with SSO.
If you receive any errors from your Identity Provider, please verify your setup and contact their support team if necessary. If you receive errors from MASV, please check the error message to see if you can determine the cause. A common culprit is incorrectly mapped attributes within your Identity Provider.