Note: Please refer to the PingOne documentation for the latest instructions for setting up SSO for applications using SAML. The instructions below are meant as a general guide and might not reflect the latest changes in PingOne. For detailed instructions about setting up SSO in MASV, see How to set up single sign-on (SSO) in MASV.
Creating a SAML Application in PingOne
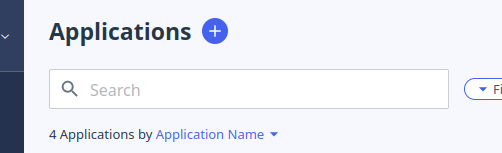
- Navigate to the “Connections” tab on the left side navigation. Once there, ensure you are on the “Applications” tab.
- Click the plus button next to the “Applications” heading to create a new application
- Give your application a name. For example “MASV”
- Select “SAML Application” as the Application Type

- Click “Configure” in the bottom left of the application configuration pane
Importing MASV’s Metadata
PingOne should now be prompting you to provide application metadata. You are given three options: import from a file, from a URL, or enter manually.
- Ensure you are logged into MASV and that you’ve selected the team you wish to configure SSO for.
- Click the team selector at the top of the left sidebar, and then click “Settings” to navigate to your team’s settings page.
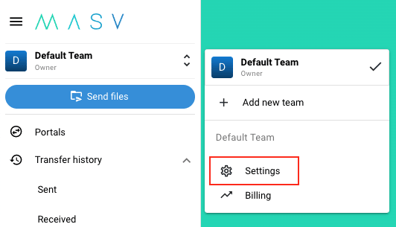
- Once on the team settings page, navigate to the “SSO” tab
If you don’t see the SSO tab, you might not be an administrator on this team. Please contact your team owner to request the necessary access. If you are an administrator but still do not see the SSO tab, SSO may not be enabled for your team.
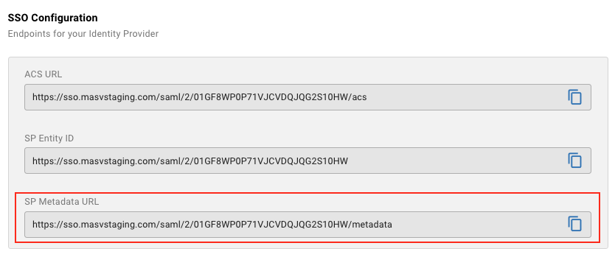
- Ensure you have ownership of at least one domain verified.
- On the right side of the screen, copy the “SP Metadata URL” value
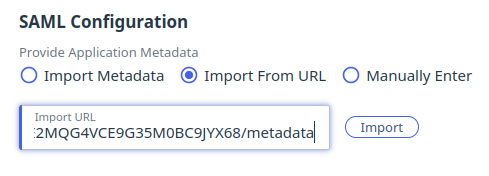
- Paste the copied URL into the PingOne “Import from URL” input, and then click “Import”
- You should now see two new inputs appear, “ACS URLs” and “Entity ID”. The values of the inputs were extracted from the metadata URL you pasted in.
- Click “Save”
Importing PingOne’s Metadata
You should be seeing the configuration screen for the new application you’ve created in PingOne. It will look something like this:

- Navigate to the configuration tab by clicking on “Configuration” on the top navigation
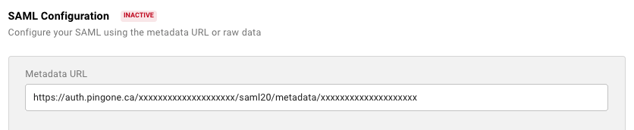
- Copy the “IDP Metadata URL”
- Navigate back to your MASV team’s SSO configuration page and paste the IDP Metadata URL you copied in the previous step into the “Metadata URL” field under the “SAML Configuration” section.
- Click “Save” in the bottom right
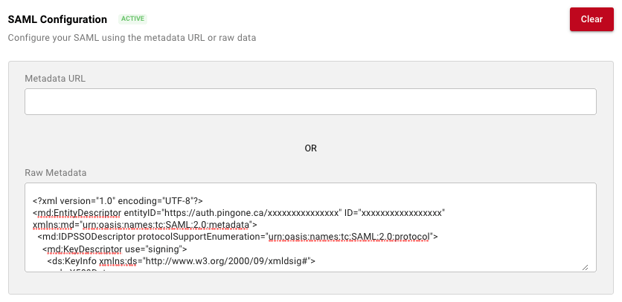
- Your SAML Configuration should now display as active, and the metadata fetched from your IDP should be displayed as XML in the “Raw Metadata” field.
- You should now see an “SSO Name” field at the top of the right side of the page. This is where you choose the name your users will use to log into your team with SSO. For example, if you entered masv, your users would enter masv as the SSO Name on the SSO login page.
- Once you have chosen and entered an SSO name, click the switch for “Enable SSO.”
You will see an option to enable or disable “Require login with SSO.” If you disable this, you can allow users to sign into MASV with SSO or email authentication. - Click “Save” once again. SSO configuration is now complete.
Mapping Attributes in PingOne
- In your PingOne application’s SAML config pane, use the top navigation to go to the Attribute Mappings tab and click the edit button.

- Use the “+ Add” button to add 2 more fields. Mark both of these fields as required by checking the “Required” checkbox.

- Name the first field email and map it to “Email Address”
Name the second field name and map it to “Username”
The resulting table should look like this:
PingOne will suggest options as you type in the “PingOne Mappings” fields. Select “Email Address” and “Username” from these suggestions to ensure correct mapping. - Click “Save” at the bottom left of the configuration pane.
Enabling The PingOne Application
In the top right of the configuration pane, you should see a toggle switch. Toggle this so the switch turns blue.

Your application is now enabled and ready for use.
Try it out
Navigate to MASV’s SSO sign-in page and enter the SSO name you chose for your team. When you click “Sign in”, you should be redirected to Ping to authenticate. Once you’ve finished authenticating, you should be redirected to MASV.
If you are redirected to the MASV dashboard, great! You can continue using MASV as usual. If you are redirected to a screen prompting you to accept an email invitation, please do so and then sign back in with SSO.