Note: Please refer to the Microsoft Entra ID documentation for the latest instructions for setting up SSO for applications using SAML. The instructions below are meant as a general guide and might not reflect the latest changes in Entra ID. For detailed instructions about setting up SSO in MASV, see How to set up single sign-on (SSO) in MASV.
To set up SSO in MASV with Microsoft Entra ID
- Sign in to the MASV Web App, as a Team Owner
- From the sidebar on the left, select the Team you want to configure with SSO from the drop-list at the top.

- From the sidebar, select Features & Settings, and select SSO.
If you don’t see SSO near the bottom of the sidebar, you might not have the required permissions or your Team might not be enabled for SSO. For more information, contact your MASV Team Owner or Administrator or support@masv.io. - Ensure you have ownership of at least one domain verified. For a guide on domain verification, read How to Verify Your Domain for Single Sign On (SSO)
-
In the “SSO Configuration” section, you should see three fields:
- ACS URL
- SP Entity ID
- SP Metadata URL
Keep this screen open as you proceed to the next section.
Creating and configuring a Microsoft Entra ID application
- Ensure you are signed into Entra ID.
- Click “Entra ID” in the sidebar, then to “Enterprise Applications”, also from the sidebar.
- Click “New application” in the top navigation.
- Click “Create your own application” in the top navigation. A pane should open to the right of the window.
- Give your application a name (for example “MASV”) and select “Integrate any other application you don’t find in the gallery (Non-gallery)”.
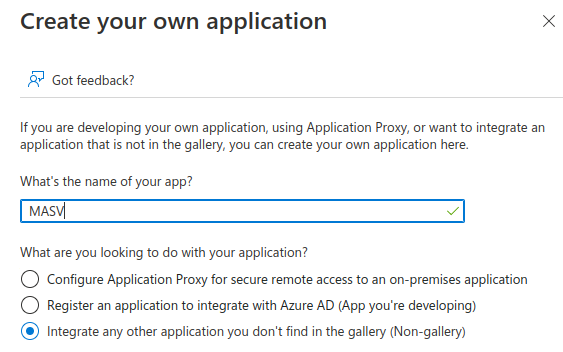
- Click “Create” on the bottom left of the pane. After a moment you should be redirected to your new enterprise application’s overview page.
- Click “Single sign-on” in the left sidebar.
- Select “SAML” as the single sign-on method and continue to the next section.
Import MASV’s Metadata
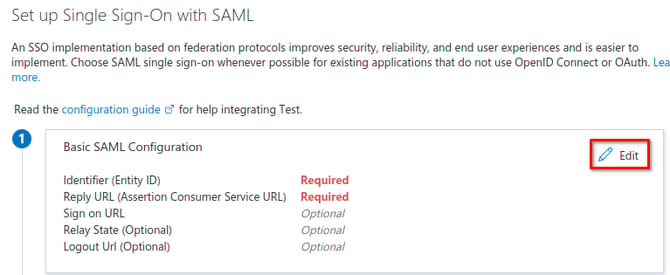
After completing the last section, you should now be presented with the SAML configuration page. You should also have your MASV team’s SSO configuration page open.
- Start by clicking the “Edit” button in the “Basic SAML Configuration” section. A pane should open on the right side of the window.
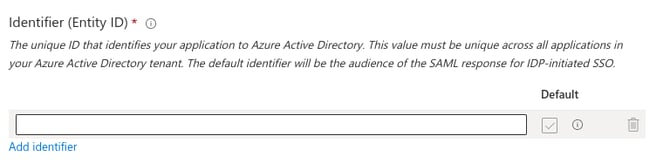
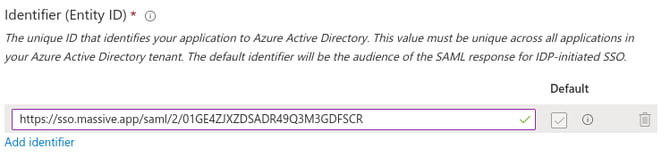
- Under “Identifier (Entity ID)” click “Add identifier”. A new row should be created.
- Copy your “SP Entity ID” value from your MASV team’s SSO configuration page and paste it into the text box in the new row.
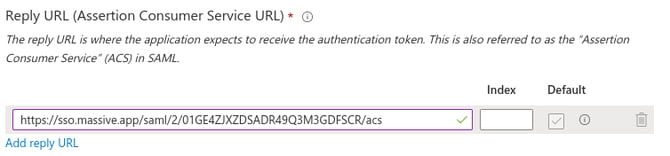
- Under “Reply URL (Assertion Consumer Service URL)” click “Add reply URL”. A new row should be created.
- Copy your “ACS URL” value from your MASV team’s SSO configuration page and paste it into the text box in the new row.
- Click “Save” on the top navigation and proceed to the next section.
Mapping Attributes in Entra ID
Now that MASV’s SP metadata has been imported into your Entra ID app, we need to map your Entra ID user attributes to fields MASV can understand.
- Click the “Edit” button to the right of the “Attributes & Claims” section on the SAML configuration page. You will be redirected.
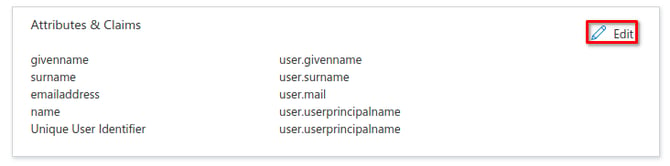
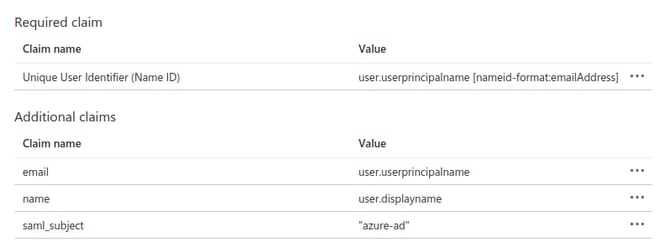
- You should now see a page which looks something like this:
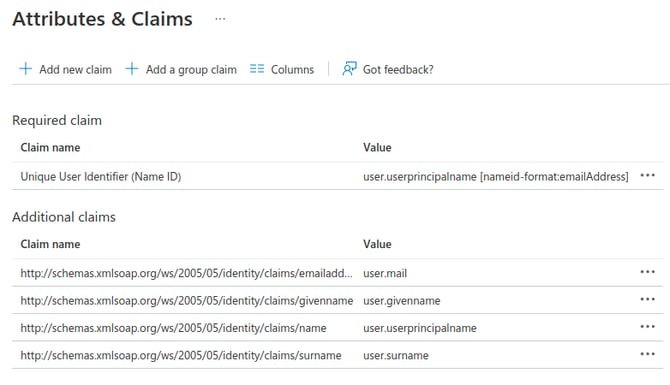
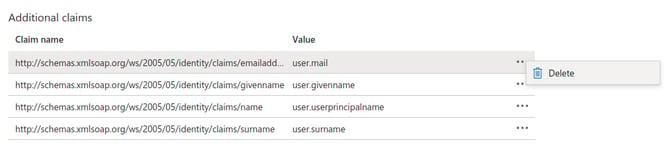
- Start by clicking the three dots next to each claim under “Additional claims” and delete them all.
- Create three new claims according to the following table using the following steps:
Name Value Required email user.userprincipalname Yes name user.displayname Yes saml_subject "Entra ID-ad” Yes role member, admin, guest, cloud_connect_config No (default is member) -
Click “Add new claim”. You will be redirected.
-
Reference the above table and enter the name value in the “Name” field.
-
Leave “Namespace” empty
-
Reference the above table and enter the value in the “Source attribute field”.
When you start typing the value, auto-completion will start suggesting values, we recommend using the suggestions to ensure everything is selected correctly.
-
Click “Save”
-
- After adding the new claims, your claims table should look like this:
- Claim mapping is now complete, continue to the next section.
Importing your Entra ID application metadata in MASV
Navigate back to your Entra ID application single sign-on settings page. To get there from the main Entra ID page, do the following:
- Click “Entra ID” in the sidebar.
- Click “Enterprise Applications” in the sidebar.
- Select the application you created and configured in previous sections.
- Click “Single sign-on” in the sidebar.
Once there, continue with the following steps:
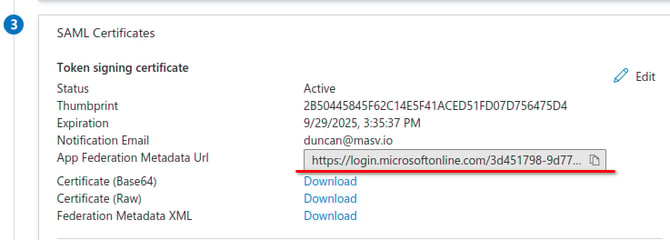
- Scroll down to the “SAML Certificates” section and copy the “App Federation Metadata Url” value.
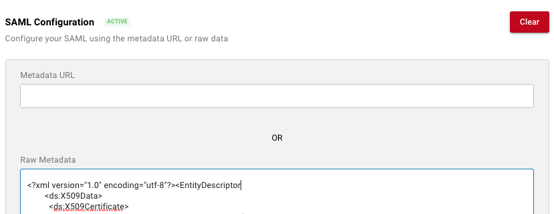
- Go to your MASV team’s SSO configuration page and paste the URL you copied into the “Metadata URL” input under “SAML Configuration”.
- Click “Save” in the bottom right.
- Your SAML Configuration should now be showing as active, and the raw XML metadata downloaded from your Entra ID application should be displayed in the “Raw Metadata” field.
- You should now see a “SSO Name” field at the top of the right side of the page. This is where you choose the name your users will use to log into your team with SSO. For example, if you entered masv, your users would enter masv as the SSO Name on the SSO login page.
- Once you have chosen and entered an SSO name, click the switch for “Enable SSO.”
You will see an option to enable or disable “Require login with SSO.” If you disable this, you can allow users to sign into MASV with SSO or email authentication. - Click “Save” once again. SSO configuration is now complete.
Assign users to your application
In order for users to sign into MASV with your SSO configuration, you need to assign users to your application within Entra ID. Refer to Microsoft’s documentation for steps.
Try it out
Navigate to MASV’s SSO sign-in page and enter the SSO name you chose for your team. When you click “Sign in”, you should be redirected to a Microsoft login page to authenticate. Once you’ve finished authenticating, you should be redirected to MASV.
If you are redirected to the MASV dashboard, great! You can continue using MASV as usual. If you are redirected to a screen prompting you to accept an email invitation, please do so and then sign back in with SSO.