LucidLink is a platform that lets users edit large shared files from one secure global workspace for real-time teamwork. Integrating LucidLink with MASV provides secure, accelerated large file transfers to and from a LucidLink Filespace.
Benefits:
- MASV Portals allow contributors to send files to a LucidLink Filespace without needing a LucidLink or MASV account. This is especially helpful when working with freelancers and contractors. All transfers are logged for tracking.
- MASV offers automation options and custom metadata collection to reduce manual processes.
On this page, you’ll find the following topics:
- What you’ll need
- LucidLink Connect
- Considerations
- Create a MASV storage gateway connection with your LucidLink Filespace
- Connect MASV Portals to LucidLink
- Automate uploads to MASV Portals
What you’ll need
- An internet-connected workstation with the LucidLink Desktop App installed and a Filespace mount. The app can be hosted on a dedicated workstation or within a cloud compute environment. Please see the LucidLink Help for installation instructions.
- The MASV Desktop App installed on the same system where your LucidLink Filespace mount point is set up or the MASV Agent, a headless agent that you can access with a command-line interface (CLI) in a Terminal window. For information about installing the MASV Agent, see installation instructions.
LucidLink Connect
If you’re using LucidLink Connect and want to use MASV Portals to deliver files to an Amazon S3 storage bucket that is linked to your LucidLink Filespace via LucidLink Connect, please see MASV and LucidLink Integration via AWS.
Considerations
-
The LucidLink Local cache size (the capacity of the mount point) needs to be set high enough to handle the size of the incoming files, current project work, and any pinned projects.
-
We recommend using MASV Express for optimal performance and to avoid syncing issues with LucidLink. Please contact support@masv.io for details.
-
You’ll set up a MASV storage gateway, and point it to your LucidLink Filespace mount point. If using more than one directory within the Filespace (folders for different projects, for example), consider using a Custom Form with your MASV Portal to dynamically direct the files to the corresponding directory. For more information, see How to use custom metadata with integrations to dynamically route Portal packages.
Create a MASV storage gateway connection with your LucidLink Filespace
The easiest way to integrate LucidLink with MASV is to set up a MASV storage gateway connection. You can use the MASV Web App to set up a storage gateway connection through the MASV Desktop App or the MASV Agent.
To integrate LucidLink with MASV using the MASV Desktop App
- After you install the MASV Desktop App, in your browser, sign in to the MASV Web App.
- From the sidebar on the left select Integrations, and on the Integrations page, select the Available Integrations tab.
- Select Desktop Mounted Storage.
- In the Add Integration window, type a meaningful name in the Connection Name box.
- In the Transfer Direction area, choose a direction:
- Save to storage: For inbound files (Write)--MASV transfers files to the storage device.
- Send from storage: For outbound files (Read)--MASV transfers files out of the storage device.
- Choose any of the following settings in Folder Options:
- (Optional for Save to storage)To set a relative path, type a path in the Target Subdirectory box. You can edit this directory from the MASV Web App as needed.
- (Optional for Save to storage) If you want to save the files in a directory that uses the package name, clear the Save directly in upload/target directory checkbox. To deliver files directly into the Target Subdirectory, select the checkbox.
- (Optional for Send from storage) To limit access to a specific folder/directory, in Source Directories, type a relative path. You can edit this directory from the MASV Web App as needed.
- In Sidecar Options, if you are passing metadata to Mimir, enter a Mimir Sidecar Form ID.
- Select Next.
- In the Register Integration window, select the Register in Desktop App button. Note: If you are using the MASV Desktop Beta App, you can use the drop-down arrow to select it.
- Select Open MASV when prompted in your browser.
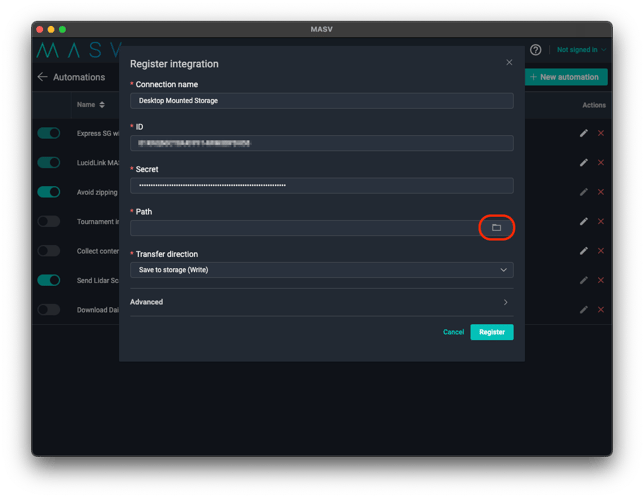
- In the MASV Desktop App, the Register integration window opens. In the Path field, select the Browse button.
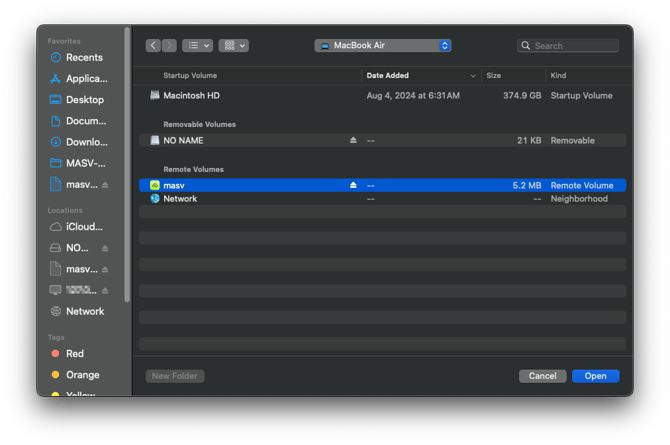
- Navigate to your LucidLink mount point, and select Open.
- Select the Register button to close the window.
- In the MASV Web App, select Done to close the registration window and complete the integration.
- You should see your integration on the My Integrations tab. Refresh the browser page to update the Status column. OK displays if the connection is successful.
To integrate LucidLink with MASV using the MASV Agent
- After you install the MASV Agent, in your browser, sign in to the MASV Web App.
- From the sidebar on the left select Integrations, and on the Integrations page, select the Available Integrations tab.
- Select Other Storage Device.
- In the Add Integration window, type a meaningful name in the Connection Name box.
- In the Transfer Direction area, choose a direction:
- Save to storage: For inbound files (Write)--MASV transfers files to the storage device.
- Send from storage: For outbound files (Read)--MASV transfers files out of the storage device.
- Choose any of the following settings in Folder Options:
- (Optional for Save to storage)To set a relative path, type a path in the Target Subdirectory box. You can edit this directory from the MASV Web App as needed.
- (Optional for Save to storage) If you want to save the files in a directory that uses the package name, clear the Save directly in upload/target directory checkbox. To deliver files directly into the Target Subdirectory, select the checkbox.
- (Optional for Send from storage) To limit access to a specific folder/directory, in Source Directories, type a relative path. You can edit this directory from the MASV Web App as needed.
- In Sidecar Options, if you are passing metadata to Mimir, enter a Mimir Sidecar Form ID.
- Select Next.
- In the Register Integration window, follow the instructions, ensuring that you edit the placeholder text ('/path/to/dir/') for the root-path, setting it to the mount point for your LucidLink Filespace.
- (Optional for "Save to storage") If you want to add UserID (UID) and/or GroupID (GID) information, at the end of the code block, append the following code, replacing the bracketed placeholders with the IDs you want: --uid <uid> and/or --gid <gid>
- Press Enter, and when the Terminal window responds with Code: 200, select the Done button in the MASV Web App .
- Your new integration displays in the list on the My Integrations tab. The status will indicate OK if the connection is successful and ready to use. You might need to refresh the page to update the connection status.
Connect MASV Portals to LucidLink
Now you’re ready to send files to your LucidLink Filespace with MASV Portals. You can use an existing Portal or create a new Portal. For more information, see How to create, edit, or delete a Portal. The instructions below connect an existing Portal.
Note: If you’re using a Portal that has multiple integrations active and you are using MASV Express, ensure that all the integrations support MASV Express (must be Amazon S3, Desktop Mounted Storage, or an on-prem destination).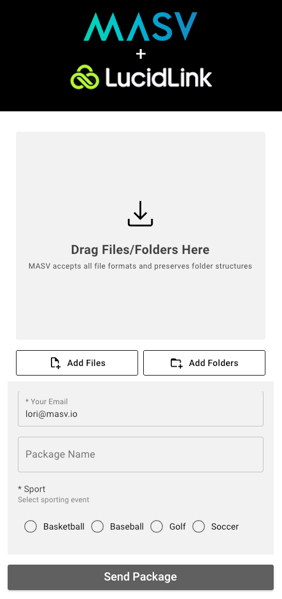
To enable a LucidLink connection for a MASV Portal
-
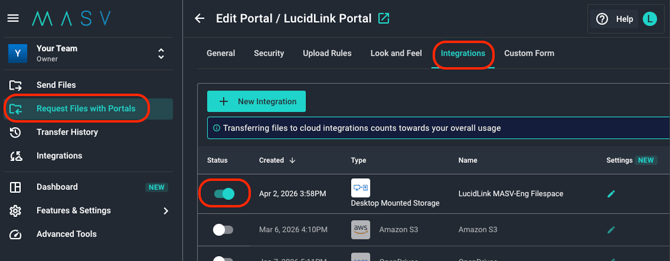
In the MASV Web App, select Request Files with Portals in the sidebar.
-
On the Request Files page, select the Portal you want to use. In the Actions column, select the vertical dots icon ︙ , and choose Edit from the menu.
-
On the Edit Portal page, select the Integrations tab, and in the Status column select the toggle beside the LucidLink connection you want to enable.
-
At the bottom of the page, select the Save button to apply your changes.
That's it! Your integration is ready to use. Now every time files are delivered using the Portal, MASV automatically transfers those files to your LucidLink Filespace. Files are sent to the Portal Downloads folder or the optional target directory you specified for the integration.
Create, edit, delete MASV Portals and integrations as needed, according to what you require for each project.
Note: You can turn off an integration at any time by following the same steps and disabling the toggle for the Portal.
Automate uploads to MASV Portals
Your contributors can choose to install the MASV Desktop App (even without a MASV account) and use a watch folder to automatically upload files to a specified MASV Portal. For details about how to automatically upload files to a MASV Portal, see Send to Portal automations.
For information about setting up automations and watch folders for the MASV Agent, see Automations in the Developer Documentation.