How to customize MASV Portal integrations
Portal integration settings let you set custom paths, filter files, and more
When you enable integrations for a MASV Portal, you can use Portal Integration Settings to control the following:
-
Subdirectory: Deliver the files to a custom path by adding a subdirectory for the integration. Type the path you want or route files dynamically based on custom metadata that has been entered by the sender.
-
[Beta] Filters: Choose which files in the package will be delivered to the integration based on file type or file name criteria.
-
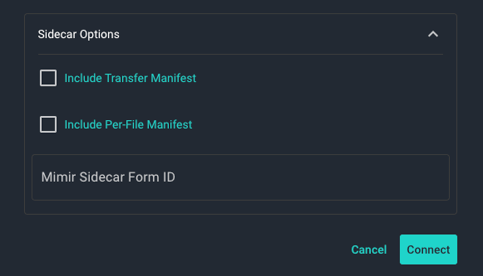
Sidecar Options: MASV Portals can be configured to pass metadata and file information via Per-File Manifest files or Mimir forms. For more information about Per-File Manifest files, see How to generate manifest files with MASV. For more information about passing metadata to Mimir, see How to connect MASV with Mimir.
This page includes the following topics:
- Set a custom subdirectory
- [Beta] Filters: Deliver files by file type or file name
- Set sidecar options
Set a custom subdirectory
You can set a subdirectory to specify a custom path for Portal packages delivered to a specific integration. The path can include static or dynamic custom metadata path elements. For more information about using dynamic elements, see How to use custom metadata with integrations to dynamically route Portal packages. If you set a filter, only the qualifying files are delivered to the destination.
The subdirectory in the example includes static and dynamic elements (indicated by curly brackets that enclose the custom metadata field that will be used to set the destination).
[Beta] Filters: Deliver files by file type or file name
You can choose which files in a Portal package are delivered to an integration by setting a file type or file name filter (a string that matches any part of the file name). For example, if you receive a package with a variety of file types, such as a set of production files that include RAW files, proxies, and notes (PDFs, CSVs, TXTs), you can set a filter to archive all files in Amazon S3, send only the proxies to a media management and review tool, such as Frame.io. You can set the filter to include or exclude files, and if you prefer, you can use a Regex (Regular Expression) to configure your filter.
Note: Filters are a Beta feature and appear in the Portal Integration Settings window only if enabled for your Team. For more information, contact support@masv.io.

You can deliver the files you want to specific integrations by using filters.
Note: Storage Device and MASV Desktop App support for filters is not yet available.
Regex for filters
When you enter the file extensions you want in MASV, the RegEx is automatically generated.
For example, if you enter .mov and .jpeg in the File types box, the following RegEx is generated:
(?i)\.(mov|jpeg)$
MASV generates a basic RegEx value that will ignore case (?i). To add file name string elements, for example, if you want to include only files that have -proxy at the end of the file name, you could add ^.*-proxy to the current RegEx string.
(?i)^.*-proxy\.(mov|jpeg)$
Or, you can use a RegEx tool of your choice to create and test your RegEx value. Many AI tools will generate RegEx values, but it's important to validate it and test it within MASV.
Set sidecar options
MASV Portals can be configured to pass metadata and file information via Per-File Manifest files or Mimir forms.
The Per-File Manifest option passes metadata and other file information as a JSON file that accompanies each file your transfers to Amazon S3 and S3-compatible integrations. For more information, see How to generate manifest files in MASV.
For Mimir, you can mirror a Mimir metadata form with a MASV custom form, and map the form by providing the Mimir form ID in the Portal Integration Settings. For more information, see How to connect MASV with Mimir.
To apply Portal Integration Settings
- In the MASV Web App, as a Team Owner or Admin, select Request Files with Portals from the sidebar on the left.
- On the Request Files page, select the menu icon
 in the Actions column for the Portal that you want to edit.
 - From the menu, select Edit.
- On the Edit Portal page, select the Integrations tab.
- Ensure the integration that you want to configure is enabled (Status column indicates toggle is in the “on” position).
- In the Settings column, select the Edit button
 .
. - In the Portal Integration Settings window, do any of the following:
- Subdirectory: Type a subdirectory.
- [Beta] Filter: In the Action box, choose Include or Exclude, and enter file extensions you want in the File types box. A RegEx value is automatically generated. If you want to include a file name element, you can customize the RegEx that was generated or use the RegEx tool of your choice to generate the expression you need and paste it into the RegEx Value box.
- Sidecar Options:
- Include Per-File Manifest: Generates a manifest file (JSON) for each file delivered.
- Mimir Sidecar Form ID: If you configured a MASV Custom Metadata form to pass metadata to an integration with Mimir, enter the corresponding Mimir form ID in the box. Form IDs entered here apply only to the current Portal.

- Select OK to close the window.
- In the lower right corner of the Edit Portal page, select Save to apply the changes.
Note: Filters are a Beta feature and appear in the Portal Integration Settings window only if enabled for your Team. For more information, contact support@masv.io.
Note: You can include a Per-File Manifest file or a Mimir Sidecar Form ID, but not both.