---
title: How to connect MASV with TrueNAS
description: Connect MASV with TrueNAS
---
[Skip to content](https://help.massive.io/en/how-to-connect-masv-with-truenas#main-content)
[](https://massive.io/)
- [Home](https://help.massive.io/en)
- [Products](https://massive.io/product/)
- [Pricing](https://massive.io/pricing/)
- [Blog](https://massive.io/blog/)
- [Company](https://massive.io/about-us/)
Open main navigation
Close main navigation
- [Home](https://help.massive.io/en)
- [Products](https://massive.io/product/)
- [Pricing](https://massive.io/pricing/)
- [Blog](https://massive.io/blog/)
- [Company](https://massive.io/about-us/)
How can we help?
- There are no suggestions because the search field is empty.
1. [Help Center - MASV](https://help.massive.io/en?hsLang=en)
2. [Apps & Integrations](https://help.massive.io/en/apps-integrations?hsLang=en)
# How to connect MASV with TrueNAS
## Simplify transfers to and from TrueNAS storage with MASV
You can integrate MASV with your [TrueNAS](https://www.truenas.com/) storage to enable high speed transfers to and from your TrueNAS platform. TrueNAS is a high performance data platform for managing any type of data, delivered through turnkey self-healing storage appliances.
This page includes the following topics:
- [Overview](https://help.massive.io/en/how-to-connect-masv-with-truenas#overview)
- [Before you begin](https://help.massive.io/en/how-to-connect-masv-with-truenas#before-you-begin)
- [Create or designate datasets](https://help.massive.io/en/how-to-connect-masv-with-truenas#datasets)
- [Install the MASV Agent on TrueNAS](https://help.massive.io/en/how-to-connect-masv-with-truenas#install)
- [Create a storage gateway connection](https://help.massive.io/en/how-to-connect-masv-with-truenas#storage-gateway)
- [Save files to your TrueNAS with MASV Portals](https://help.massive.io/en/how-to-connect-masv-with-truenas#portals)
- [Next steps](https://help.massive.io/en/how-to-connect-masv-with-truenas#next-steps)
### Overview
You can connect MASV with TrueNAS in just a few steps by installing the MASV Agent Docker container as a custom app via your TrueNAS software. The MASV Agent acts as a local server that can be configured to automate file uploads, downloads, and storage connections. By deploying it as a TrueNAS custom app, you can build high-speed file transfer workflows directly on your system.
Steps for connecting MASV to TrueNAS include:
1. Sign in to TrueNAS and create a dedicated MASV service user.
2. Create or choose the datasets that you want to use with the MASV Agent. You will map a **config** and **data** mount point to the datasets. Set the permissions for your datasets, including if you want to create a dedicated service user for MASV that has the correct permissions for the datasets (UID/GID).
3. Install the Docker version of the MASV Agent to your TrueNAS as a custom app.
4. Create a storage gateway connection for secure transfers to or from your storage. You can then use MASV Portals to enable high-speed transfers to your TrueNAS.
### Before you begin
- Check your TrueNAS version: Ensure you are running a compatible version of TrueNAS platform software: TrueNAS version 25.10 or higher.
- If you want to set up additional functionality, such as watch folder automations, you can [generate a MASV API key](https://help.massive.io/en/how-to-create-and-manage-api-keys-in-masv?hsLang=en) in the MASV Web App in order to set up authentication (the MASV Agent authenticates this key at startup).
- If creating a dedicated user for the MASV Agent, make note of the user (UID) and group (GID) numbers. You'll need these when you configure the MASV Agent as a TrueNAS app.
### Create or designate datasets
You will need two datasets for the MASV Agent: One for the MASV config files and one for the MASV file transfers. You have the option to create new datasets or select existing datasets. Creating new datasets lets you easily identify MASV Agent transfers and the configuration and transfer records, isolating them from other files. Selecting an existing dataset for transfers lets you take advantage of any pre-existing workflows associated with your current dataset.
#### To create or designate datasets for the MASV Agent
1. In your TrueNAS application, from the sidebar on the left, select **Datasets**.
2. On the **Datasets** page create (**Add Dataset**) or select an existing dataset for each of the following:
3. MASV **config** files: You need to map the MASV Agent config files to a small dataset. For example, Default/masv-config.This data keeps your settings and transfer records intact across container updates and restarts, so creating a new dataset for config is recommended.
4. MASV **data** transfer location: Identify or create a dataset that MASV will use for transfers (for example, Default/masv-data).
5. On the **Datasets** page, select one of the designated datasets.
6. In the panel on the right, navigate to the **Permissions** area and select **Edit**. Ensure the user/group you use with MASV Agent can read and write to the dataset. Refer to your [TrueNAS documentation](https://www.truenas.com/docs/) for details on permissions.
7. Select **Save**, and repeat steps 3-5 for the second dataset.
### Install the MASV Agent on TrueNAS
You can install the Docker version of the MASV Agent as a TrueNAS custom app. Adding a MASV API key is optional. It is not required for integrations with MASV (storage gateway connections), but necessary if you want to set up automations with the MASV Agent (not relying on user authentication).
#### To install the MASV Agent on TrueNAS
1. Sign in to your TrueNAS application.
2. In the sidebar on the left, select **Apps**.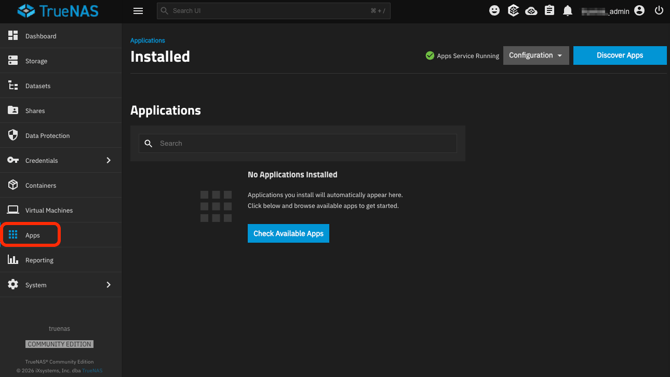
3. In the upper right corner, select **Discover Apps**.
4. On the **Discover** page, in the upper right corner, select **Custom App**.
5. On the **Install Custom App** page, in the **Application Name** field, type a name for the MASV Agent app (for example, masv-agent).
6. In the **Image Configuration** area, set the following fields:
1. **Repository:** masvio/masv-agent
2. **Tag:** Select latest or to set a specific version of the MASV Agent, enter a version number.
3. **Pull Policy**: Set the option appropriate for your environment.
7. (Optional) In the **Container Configuration** area, if you are entering a MASV API key for authentication, do the following:
1. In the **Command** area, select **Add**, and in the field that displays, type the following argument: --api-key
2. Select **Add** again, and paste your MASV API key.
8. In the **Timezone** field, set a timezone that will be used to log MASV Agent activities.
9. In the **Restart Policy** field, **Unless Stopped** is the recommended setting.
10. In the **Security Context Configuration** area, configure any of the settings you need to conform with the user and group you have associated with permissions for MASV Agent. (UID/GID)
11. In the **Storage Configuration** area, and do both of the following:
1. Select **Add** and in the **Type** field, select **Host Path** and in the **Mount Path** field, type `/config`. In the **Host Path** field, navigate to the TrueNAS storage location (outside the MASV Agent container) that you have designed for your config files (for example, `masv-config`).
2. Select **Add** and in the **Type** field, select **Host Path** and in the **Mount Path** field, type `/data`. In the **Host Path** field, navigate to the TrueNAS storage location (outside the MASV Agent container) that you have designated for your file transfers (for example, masv-data).
12. Select the **Install** button at the bottom of the page to run the MASV Agent installation.
**Tip**: You can easily update the MASV Agent from TrueNAS, but we recommend that you back up the **config** dataset before so you can roll back if needed. Consult your [TrueNAS documentation](https://www.truenas.com/docs/) for more information.
#### To verify the API key (optional)
1. In your TrueNAS app, from the sidebar on the left, select **Apps**.
2. On the **Installed** page, select masv-agent, and ensure the **Status** column displays **Running**.
3. In the **Workloads** area, select the **Shell** icon to open a terminal inside the container.
4. Confirm the MASV Agent is authenticated by typing the following request: `masv user status`
The response lists your user and Teams, confirming the API key is active.
**Note**: The MASV Agent server starts automatically when the container launches. If you added the API flag and key when configuring the installation, the MASV Agent authenticates for persistent, session-free access. No shell login is required.
### Create a storage gateway connection
After you create and configure the MASV Agent container on your TrueNAS device, you can finish setting up the integration by creating a secure connection between MASV and the device.
**Note**: If TrueNAS is not enabled for your MASV Team, please contact [support@masv.io](mailto:support@masv.io) to request activation.
#### To connect a TrueNAS to MASV using storage gateway
1. In the **MASV Web App**, as Team Owner or Admin ([role](https://help.massive.io/en/what-are-the-permissions-for-owner-admins-and-members-of-your-team?hsLang=en)), select **Integrations** from the sidebar on the left.
2. From the **Integrations** page, select the **Available Integrations** tab, and select TrueNAS.
3. 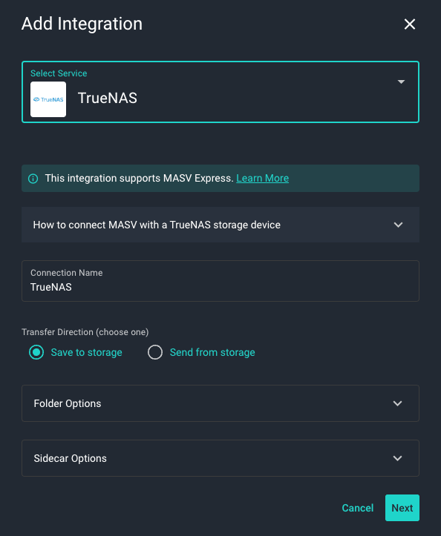In the **Add Integration** window, type a name in the **Connection Name** box.
4. In the **Transfer Direction** area, choose a direction:
1. **Save to storage**: For inbound files (Write)–MASV transfers files to the storage device.
2. **Send from storage**: For outbound files (Read)–MASV transfers files out of the storage device.
5. Choose any of the following settings in **Folder Options** or **Source Directories**:
1. [**Target Subdirectory**](https://help.massive.io/en/how-to-use-target-subdirectory?hsLang=en) (**Save to storage** direction only): To set an optional relative path, type a path in the **Target Subdirectory** box. You can edit this directory as needed.
2. **Save directly in upload/target directory** (**Save to storage** direction only): If you want to save the files in a directory that uses the package name, clear the checkbox. To deliver directly into the **Target Subdirectory**, select the checkbox.
3. **Source Directories** (**Send from storage** direction only): To limit access to a specific folder/directory, in **Source Directories**, type a relative path. You can edit this directory as needed.
6. (Optional, **Save to storage** direction only) In **Sidecar Options**, if you are passing metadata to Mimir, enter a **Mimir Sidecar Form ID**.
7. Select **Next**.
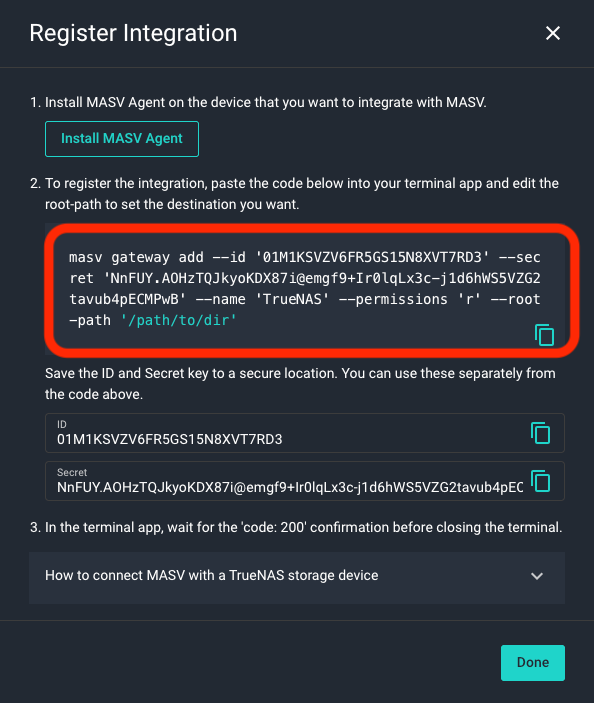
8. In the **Register Integration** window, skip step 1 (assuming you have installed the MASV Agent by following the instructions at the top of this page), and copy the block of code from step 2.
9. In TrueNAS, from the sidebar on the left, select **Apps**, and select the **MASV Agent** in the **Applications** list.
10. From the panel on the right, in the **Workloads** area, select the **Shell** icon that appears.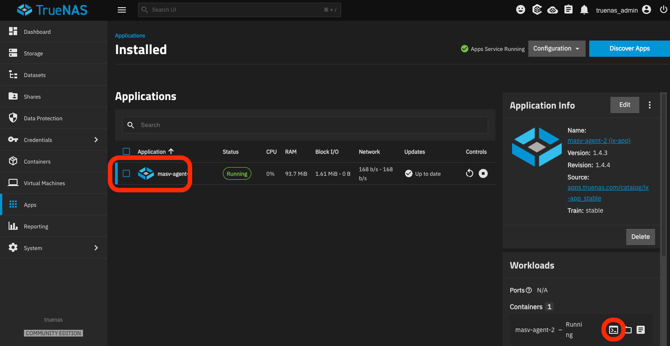
11. In the **Container Shell** window, paste the block of code from MASV, and edit the root path to match your data mapping (for example, change `‘/path/to/dir’` to `‘/data/’` if you used the default container mount point name).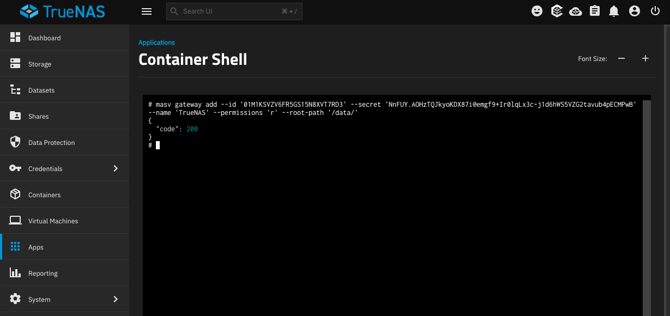
12. Press **Enter**. A successful connection displays `code 200`.
13. In the **MASV Web App**, select the **Done** button.
14. In the **MASV Web App**, your new integration displays in the list on the **My Integrations** tab. Refresh the page to update the Status column. **OK** displays if the connection is successful and ready to use.
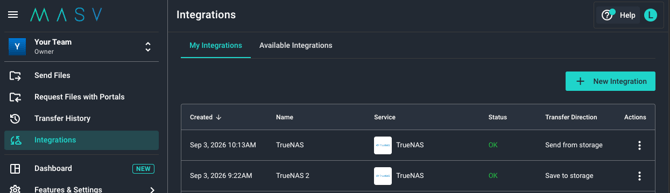
**Note**: The MASV **Status** column indicates if a connection is registered. It does not indicate when a target device becomes unavailable, so monitor your destination device to ensure it is available for transfers.
### Save files to your TrueNAS with MASV Portals
Now that you’ve created a storage gateway connection, if you selected the **Save to storage** transfer direction, you can use MASV Portals to collect files. Portals are web uploaders that make it easy to collect files from contributors and deliver them to your storage of choice.
If you don’t already have a MASV Portal, you can create one in the MASV Web App. For full instructions, see [How to create, edit, or delete a portal](https://help.massive.io/en/how-to-create-a-portal-in-masv?hsLang=en). You can create an Instant Portal in a couple of clicks, or create a Custom Portal that is brandable, sets file requirements, and collects metadata.
#### To save files to your TrueNAS by using MASV Portals
1. In the **MASV Web App**, select **Request Files with Portals** from the sidebar on the left.
2. On the **Request Files** page, choose a portal, and in the **Actions** column, select the menu icon \[three vertical dots\], and select **Edit**.
3. On the **Edit Portal** page, select the **Integrations** tab, and in the **Status** column, enable the toggle for your TrueNAS integration.
4. Select the **Save** button in the lower right corner of the page to apply the changes.
5. Return to the **Request Files** page. Now you’re ready to send a file request. Select the **Actions** menu icon for your portal, and select **Send Upload Request** from the menu.
6. Fill in the **Send Upload Request Via Email** fields, adding the email recipients and the message that you want to send.
7. Select the **Send Request** button to close the window.
Recipients receive an email with a link to the portal upload page.
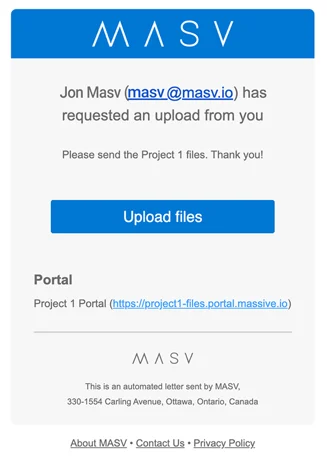
After the recipient uploads files, you'll receive an email confirming that a package has been delivered to your integration.
### Next steps
- **Automations**: If you configured the MASV Agent with an API key, you can create [automations](https://developer.masv.io/agent/automations/) via the CLI to monitor specific portal subdomains and [watch folders](https://developer.masv.io/agent/automations/#watch-folder) and handle transfers automatically.
- **MASV as a transfer hub**: In addition to saving files to your storage, if you have a **Send from storage** integration with TrueNAS, you can [transfer files from your storage with MASV](https://help.massive.io/en/how-to-send-files-using-masv?hsLang=en#send-from-integration), programmatically or by using the MASV Web App.
- **Performance optimization**: You can tune transfer performance by [configuring disk I/O](https://developer.masv.io/agent/settings/#disk-configuration), [multiconnect](https://developer.masv.io/agent/settings/#multiconnect), [network concurrency](https://developer.masv.io/agent/settings/#network-concurrency), and[rate-limit settings](https://developer.masv.io/agent/settings/#rate-limits) via the MASV Agent CLI or REST API.
- [Get started with MASV](https://help.massive.io/en/get-started-with-masv?hsLang=en)
- [Send and request files](https://help.massive.io/en/send-and-request-files?hsLang=en#main-content)
- [Send files](https://help.massive.io/en/send-and-request-files?hsLang=en#send-files)
- [Request files with portals](https://help.massive.io/en/send-and-request-files?hsLang=en#request-files-with-portals)
- [MASV Desktop App](https://help.massive.io/en/send-and-request-files?hsLang=en#masv-desktop-app)
- [Advanced settings](https://help.massive.io/en/send-and-request-files?hsLang=en#advanced-settings)
- [Apps & Integrations](https://help.massive.io/en/apps-integrations?hsLang=en#main-content)
- [Working with integrations](https://help.massive.io/en/apps-integrations?hsLang=en#working-with-integrations)
- [Cloud integrations](https://help.massive.io/en/apps-integrations?hsLang=en#cloud-integrations)
- [On-premises and cloud storage devices](https://help.massive.io/en/apps-integrations?hsLang=en#on-premises-and-cloud-storage-devices)
- [Asset management & collaboration](https://help.massive.io/en/apps-integrations?hsLang=en#asset-management-collaboration)
- [Teams and user management](https://help.massive.io/en/teams-and-user-management?hsLang=en#main-content)
- [Teams](https://help.massive.io/en/teams-and-user-management?hsLang=en#teams)
- [Roles & Teamspaces](https://help.massive.io/en/teams-and-user-management?hsLang=en#roles-teamspaces)
- [Single Sign-On (SSO)](https://help.massive.io/en/teams-and-user-management?hsLang=en#single-sign-on-sso)
- [Manage file transfers](https://help.massive.io/en/manage-file-transfers?hsLang=en#main-content)
- [Transfer History & Dashboard](https://help.massive.io/en/manage-file-transfers?hsLang=en#transfer-history-dashboard)
- [Notifications](https://help.massive.io/en/manage-file-transfers?hsLang=en#notifications)
- [Custom Metadata](https://help.massive.io/en/manage-file-transfers?hsLang=en#custom-metadata)
- [Account and billing](https://help.massive.io/en/account-and-billing?hsLang=en#main-content)
- [Account](https://help.massive.io/en/account-and-billing?hsLang=en#account)
- [Billing](https://help.massive.io/en/account-and-billing?hsLang=en#billing)
- [Extended Storage](https://help.massive.io/en/account-and-billing?hsLang=en#extended-storage)
- [FAQs](https://help.massive.io/en/faqs?hsLang=en)
- [Releases](https://help.massive.io/en/releases?hsLang=en)
- [MASV Desktop App](https://help.massive.io/en/masv-desktop-app?hsLang=en)
[](https://massive.io)
#### MASV Help Center
**[MASV Service Status](https://masv.statuspage.io/)**
Copyright © 2026, MASV