
MASV makes it easy for you and your collaborators to ingest large files into Amazon EBS (Elastic Block Storage) or Amazon EFS (Elastic File Storage) storage attached to your Amazon EC2 (Elastic Compute Cloud) instance. Sending large files from Amazon EBS and EFS storage is just as easy when you integrate with MASV.
This page includes the following topics:
- Overview
- Install the MASV Agent on an Amazon EC2 instance
- Connect MASV and Amazon EBS/EFS storage
- Save files to your EBS storage with MASV portals
Overview
The basics steps for setting up MASV with your Amazon EBS or EFS include:
- Install the MASV Agent on your Amazon EC2 (Elastic Compute Cloud) instance.
- Create a secure connection to an Amazon EBS or EFS directory in the MASV Web App.
- Use MASV Portals to ingest files from contributors or send files from your Amazon EBS or EFS storage.
For information about the MASV Agent, visit MASV Developer Documentation.
Install the MASV Agent on an Amazon EC2 instance
The first step is to install the MASV Agent to the Amazon EC2 instance that is connected to your EBS/EFS storage. You can install MASV Agent using Docker or install on:
Sample installation
Here's an example installation sequence for Amazon Linux 2023 (RPM-based):
-
In the Amazon EC2 Terminal, paste the following code, and press Enter.
-
sudo tee -a /etc/yum.repos.d/masv-agent.repo > /dev/null <<EOF
[masv-agent]
name=MASV Agent
baseurl=https://dl.massive.io/agent/rpm
enabled=1
gpgcheck=1
gpgkey=https://dl.massive.io/agent/publickey.gpg
EOF
-
-
Copy and paste the following commands, and press Enter.
-
sudo yum install masv-agent
-
-
If prompted, verify that the GPG key Fingerprint displayed matches the following: 087F 5276 E175 06C4 3A5C 1A06 F400 D772 9479 7DAE. If so, type Y, and press Enter.
- When you see Complete!, you’re ready to set up your integrations in the MASV Web App.
Connect MASV and your Amazon EBS/EFS storage
After the MASV Agent is installed, you're ready to set up an integration in the MASV Web App. You can add as many integrations as you need for the locations and transfer directions you want.
To connect Amazon EBS/EFS storage to MASV
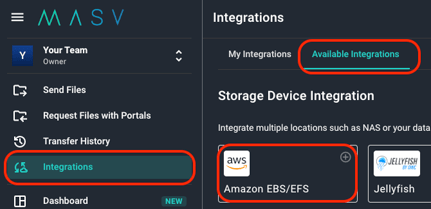
- In the MASV Web App, as Team Owner, Admin, or Integration Manager (role), select Integrations from the sidebar on the left.
- From the Integrations page, select the Available Integrations tab, and select Amazon EBS/EFS.
- In the Add Integration window, type a name in the Connection Name box.
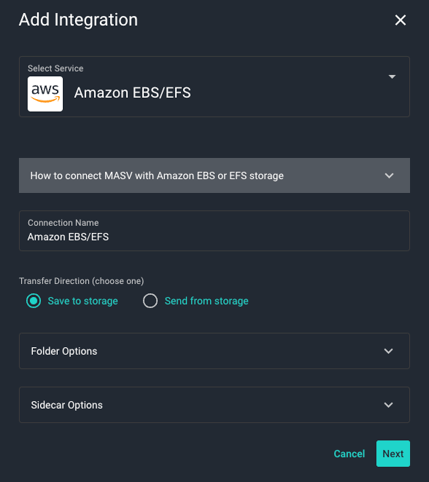
- In the Transfer Direction area, choose a direction:
- Save to storage: For inbound files (Write)--MASV transfers files to the storage device.
- Send from storage: For outbound files (Read)--MASV transfers files out of the storage device.
-
Choose any of the following settings in Folder Options or Source Directories:
- Target Subdirectory (Save to storage direction only): To set an optional relative path, type a path in the Target Subdirectory box. You can edit this directory as needed.
- Save directly in upload/target directory (Save to storage direction only): If you want to save the files in a directory that uses the package name, clear the checkbox. To deliver directly into the Target Subdirectory, select the checkbox.
- Source Directories (Send from storage direction only): To limit access to a specific folder/directory, in Source Directories, type a relative path. You can edit this directory as needed.
- (Optional, Save to storage) In Sidecar Options, if you are passing metadata to Mimir, enter a Mimir Sidecar Form ID.
- Select Next.
- In the Register Integration window, skip step 1 (assuming you have installed the MASV Agent by following the instructions at the top of this page), and copy the block of code from step 2.
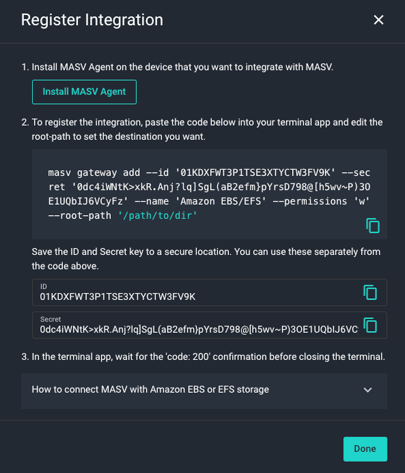
- Paste the code block into your Amazon EC2 Terminal.
- In your Terminal window, edit the placeholder text ('/path/to/dir/') for the root-path to point to a pre-existing directory that you want to access. For example, if using the default path for the MASV Agent, replace '/path/to/dir/' with '/data/'.
- (Optional, Save to storage) If you want to add UserID (UID) and/or GroupID (GID) information for Linux systems, at the end of the code block, append the following code, replacing the bracketed placeholders with the IDs you want:
--uid <uid>and/or--gid <gid> - Press Enter, and when the Terminal window responds with Code: 200, select the Done button in the MASV Web App .
- Your new integration displays in the list on the My Integrations tab. Refresh the page to update the Status column. OK displays if the connection is successful and ready to use.
Important: The MASV Status column does not indicate when a target device becomes unavailable (stopped, off, removed...), so monitor your destination device to ensure it is available for transfers.
Notes for Docker
- If you're running the MASV Agent with Docker, you must execute `masv` or `curl` commands within the container.
- When setting your root-path, it needs to be relative to the shared directory you created in Docker. For example,
/data/.See our Docker setup guide for more details.

Save files to your Amazon EBS/EFS with MASV portals
MASV portals are web uploaders that make it easy to collect files from contributors and deliver them to your storage of choice. Lets take a look at how this process works with your new Amazon EBS/EFS storage integration.
You’ll first need a MASV portal. If you don’t already have one set up, you can create one in the MASV Web App. For full instructions, see How to create, edit, or delete a portal. You can create an Instant Portal in a couple of clicks, or create a Custom Portal that is brandable, sets file requirements, and collects metadata.
To save files to your Amazon EBS/EFS storage by using MASV portals
1. In the MASV Web App, select Request Files with Portals from the sidebar on the left.
2. On the Request Files page, choose a portal, and in the Actions column, select the menu icon [three vertical dots], and select Edit.
3. On the Edit Portal page, select the Integrations tab, and in the Status column, enable the toggle for your EBS/EFS integration.
4. Select the Save button in the lower right corner of the page to apply the changes.
5. Return to the Request Files page. Now you’re ready to send a file request. Select the Actions menu icon for your portal, and select Send Upload Request from the menu.
6. Fill in the Send Upload Request Via Email fields, adding the email recipients and the message that you want to send.
7. Select the Send Request button to close the window. Recipients receive an email with a link to the portal upload page.
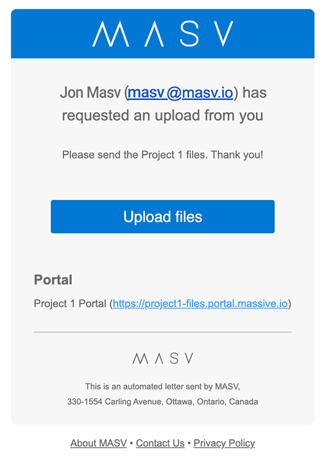
After the recipient uploads files, you'll receive an email confirming that a package has been delivered to your Amazon EBS/EFS integration.
Tip: You can monitor all sent or received packages efficiently using the MASV Web App. Navigate to Transfer History, access the Received tab to view a detailed delivery log of received packages. From here, you can also send any active package to integrations by selecting the package, and from the Actions menu choosing Send Package to Cloud, and selecting the integration.